Pages - Menu

Showing posts with label MVC. Show all posts

Migrating a Website from Bootstrap 2.x to 3.x with SASS and AngularJS

 Scope

My photography website was developed by using Bootstrap 2.x. Here are some technical details about my site.
  • A small website with less than 10 HTML pages.
  • Hosted on AWS S3 with static content only.
  • Since it is on S3, there are no backend languages allowed. C# or php are off the limit.
  • Contact Us form is a 3rd party service iframed somewhere else.

I was quite happy with it for several reasons.
  • Responsiveness.
  • Simple and efficient with no backend developments.
  • Extremely cheap and fast with AWS S3.
  • Does the job well for my purpose. 
  • UX score of 100 by Google PageSpeed Insight


Unfortunately, it has some downsides though.
  • There are no one header and footer file for the site. Therefore, a lot of copy and paste to do between pages just for the same piece of code. 
  • The hover status of the nav bar is hardcoded. :(
  • CSS and JS are not optimized.
Recently my designer did a makeover design for my site as she described my site as "dull and boring" :) I thought I might as well upgrade my site to a newer version of Bootstrap as it is more mobile friendly..

Bootstrap

Firstly, we will download our Bootstrap source and extract to our local folder.


According to the spec, I could just use the Bootstrap distribution version for my purpose, but as a developer, I wanted to see what's in the goody bag by getting my hands dirty.

As Bootstrap 4 is moving from Less to Sass, so I've decided to go with the Sass port for a comfort of future compatibility. It is currently at v3.3.5, so this is what we are going with.

Sass (Syntactically Awesome StyleSheets)

Setup

Firstly, we need to install Ruby. Then we will use Gem to install the sass package.

$ gem install sass

Now we will be able to use Sass to compile our css. There are many ways in using Sass.

And a more advanced approach will be using the Compass.

$ gem install compass
$ cd $/bootstrap.sass/assets
$ compass init

After we run these commands, it will install the compass and initialize a compass config file with some stub css files. A message in the console would look like this.


In order to work with the Bootstrap structure, I moved the stub files from $/sass to $/stylesheets, and changed the path as follow.

http_path = "/"
css_dir = "css"
sass_dir = "stylesheets"
images_dir = "images"
javascripts_dir = "javascripts"

Compass commands are quite straight forward. The following command will compile the sass files manually.

$ compass compile

We can also use the watch command to recompile automatically when there are changes made to the the sass files.

$ compass watch


Minification

To minify the css files, we can add a compressed switch in the compile command.

$ compass compile -s compressed

Or we can change the default setting in the config.rb file.

output_style = :compressed

I have also created a callback function that will generate different files for development and production environment by passing in a different switch.

In my config.rb, I will set my output style depending on the environment, and we will append the .min naming convention when compressing.

output_style = (environment == :production) ? :compressed : :expanded

on_stylesheet_saved do |file|
 if File.exists?(file) && (output_style == :compressed)
  filename = File.basename(file, File.extname(file))
  FileUtils.mv(file, css_dir + "/" + filename + ".min" + File.extname(file))
  puts "   minify " + css_dir + "/" + filename + ".min" + File.extname(file)
 end
end

We can now control what to output by switching between development (default) and production.

Map File

In order to generate the map files, it can be done via a switch.

compass compile --sourcemap

Or in my config.rb.

sourcemap = (environment == :production)

CSS Vendor Prefixes

In order to deal with the CSS Vendor Prefixes, and because we chose not to use the Gruntfile from bootstrap, we need to integrate our own Autoprefixer.

By following the Autoprefixer Rails guide, we will install the gem.

$ gem install autoprefixer-rails

And we will add a callback in our compass config.rb as follow.

require 'autoprefixer-rails'

on_stylesheet_saved do |file|
  css = File.read(file)
  map = file + '.map'

  if File.exists? map
    result = AutoprefixerRails.process(css,
      from: file,
      to:   file,
      map:  { prev: File.read(map), inline: false })
    File.open(file, 'w') { |io| io << result.css }
    File.open(map,  'w') { |io| io << result.map }
  else
    File.open(file, 'w') { |io| io << AutoprefixerRails.process(css) }
  end
end

Testing it by creating a new test.sass as follow.

a {
    display: flex;
}

After we compile, we now have a vendor prefix css generated.

/* line 1, ../stylesheets/test.scss */
a {
  display: -webkit-box;
  display: -webkit-flex;
  display: -ms-flexbox;
  display: flex;
}

Compile

In our screen.scss (generated by compass init), we will add this line. This will import the partial bootstrap scss to our screen.scss. We can add our custom scss in this file later on.

@import "bootstrap";

Migration

There are comprehensive migration guide done by the Bootstrap team. There are also conversion tool available that will do the boring part of the find and replace job.

AngularJS

I am also ditching the default bootstrap jquery and using AngularJS. It is just a nicer way for me to manage header and footer without using any backend language like C# or php.

This can be achieved by using UI Bootstrap if done correctly.

I need to make some small changes in our html to remove the default bootstrap / jquery js and include angular and ui bootstrap js.

<!-- include angular js -->
<script src="js/angular.min.js"></script>

<!-- include ui bootstrap -->
<script src="js/ui-bootstrap-tpls-1.3.1.min.js"></script>

<!-- remove jquery and bootstrap js -->
<script src="js/jquery-1.9.1.min.js"></script>
<script src="js/bootstrap.min.js"></script> 

Now I am able to use ng-include to add header and footer.

<div ng-include = "'_header.html'"></div>

Also, an angular based carousel that can render my image gallery.

<div id="carousel">
    <uib-carousel active="active">
      <uib-slide ng-repeat="f in selected.files track by f" index="f">
        <img ng-src="img/{{ selected.folder }}/{{ f }}.jpg" />
      </uib-slide>
    </uib-carousel>
</div>


nopCommerce - Multi Tenancy - Round 3

Multi Tenancy in nopCommerce by itself seems like an on going project for me now. Previously, I talked about how I was able to create brand specific dll in one share code base. (No splitting / branching in Source Control, one code base only). I used MS Build to separate the dlls during compilation which is neat but clumsy, as most developers would overlook these places. These can be found in here.

http://tech.sunnyw.net/2014/07/nopcommerce-multi-tenancy-2.html
http://tech.sunnyw.net/2014/05/nopcommerce-multi-tenancy.html

Scope

Previously I mentioned,
nopCommerce uses App_Data\Settings.txt to store database connection string... it became a hassle to swap connection string for local development as web config transformation does not help...
The problem arise not only with development environment that I have to constantly swap connection string, but in the event of multi tenancy with same code base and separated database, the code needs to connect to the correct database automatically.

Also, this cannot be simply done by a plugin or a check of store id in nop, as we would need to connect to the right database to get the store context.

Last but not least. This article is base on nopCommerce 3.3.

Objective

  • During developments, the correct database will be picked for multiple bindings without changing Settings.txt.
  • During deployment, the correct connection string applied to the websites without manually changing the Settings.txt in production environment.
  • Conform with the nopCommerce coding standard, so we are making the least changes. Best coding practice comes after this.

Setup

For our development environment, we will add multiple domain bindings to one website.

Note we only need to bind once for all https traffic. Https binding always work on IP base not domain base, as domain information is stored in HTTP Header that is encrypted as part of the https protocol.


Although nopCommerce doesn't have multi-tenancy supported out of the box, but its multi-store functionality will help assign different stores base on the url. I have previously demonstrated that.

Note that we would not do multi binding for live environment as we still want to have separate app pool for different websites for now,

Code

Settings.txt


We need to create a bunch of Settings_{site}.txt, one for each site.

Settings_site1.txt
Settings_site2.txt
...

We will have different connection strings in each Settings.txt files.

DataSettingsManager.cs


Ideally I would like to extend this class and override the method in my own class. Unfortunately, this class does not implement any interface and no IoC involved. Plus, some vendor plugins also hard-coded the way how to instantiate this object, usually find in plugins that create their own ObjectContext.

In the LoadSettings and SaveSettings method, we will change the way how filename is picked by default to our private function.

filePath = Path.Combine(MapPath("~/App_Data/"), GetSettingFileName());

private string GetSettingFileName()
{
    var dbSettingName =  ConfigurationManager.AppSettings["DBSettingName"];
    var filePath = Path.Combine(MapPath("~/App_Data/"), dbSettingName);
            
    if (File.Exists(filePath))
    {
        return dbSettingName;
    }

    return filename;
} 

Web.config Transformation


We added a new key in the web config.
<add key="DBSettingName" value="Settings_site1.txt" />

We also need to provide transformation for each build config.
<add key="DBSettingName" value="Settings_site2.txt" xdt:Transform="SetAttributes" xdt:Locator="Match(key)" />

Switch


To switch between sites during developments, we will use SlowCheetah to help transform our web.config. The correct connecting string will be picked via web config.


Conclusion

This is a step forward towards turning our sites to true multi-tenants environment. During development, I am now able to connect to the corresponding database just by transforming the webconfig.

In the future, I am hoping a particular store will always connect to its own db even if I bind multiple sites to only one set of dlls (one IIS website). Then I will be able to scale out the websites and provide high availability.
  • Brand specific dependencies need to be removed from web.config to another persistent storage. Maybe a share database or some sort.
  • Need to change how DataSettingsManager is instantiated. It needs to be done via IoC so it can be extended.
  • Find a balanced approach for scalibility.

nopCommerce - Schedule Task Plugin

Scope

Recently having issues with the integration with our payment gateway provider. Occasionally our synchronize call to their server will not get a response back.

We are to write a schedule function to run regularly. It will pull out a list of pending orders and re-run the authorize and capture.

We are:-
  • using nopCommerce 3.3
  • utilizing the nopCommerce Schedule Task
  • using plugin approach

Technical Overview

We are to use the Nop.Services.Tasks.Task and ScheduleTaskService to create a Nop Schedule Task that runs periodically.

Implementation

Task

Firstly create a new plugin. In our plugin, we will create a MyTask class that implements ITask.


The only method in the interface is Execute(). This is the place where we will put our calling codes. In this example, I am calling my own method QueryPendingOrders().

IoC

In my example, I am using a new service class, so I will need to register the service class via IoC in our plugin. A new DependencyRegistrar class will do the trick.


Install Schedule Task

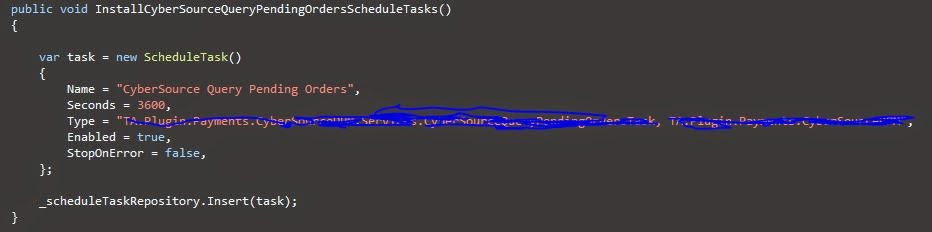
Next, we need to create a schedule task for the task. This can be done by 
the overrides of Nop.Core.Plugins.BasePlugin, In the Install() of my plugin, we will call the following.


Calling Method

For the purpose of demonstration, I am just writing to the log.


Schedule

After installing the plugin, a new schedule task is created as follow. (I have changed the run period to 60 seconds for demo)


Log

Let it run for a few minutes and check the log. It seems quite spot on that it is called every 60 seconds.


Conclusion

There was not much work involved to create a schedule task. All the magic are already done and made available for us from the nopCommerce.

During development, I noticed the TaskManager utilize singleton pattern. It is then responsible to instantiate the instances for the TaskThread. The task threads will run continuously and kick off the Execute() periodically. 

One thing I wanted to do is to compare the performance between Nop Schedule Task vs SQL Server Agent Job. I have a feeling that the sql job may run a little faster as the nop task thread is not a push notification, but simply a continuous running thread.


Performance Tuning - nopCommerce Category Page by Caching

Scope

In eCommerce, perhaps the most heavily viewed page is the product listing page (category page). It is the page that draws shoppers attraction, quick glance at the products and prices. We are trying to minimize the load time of the page as the scope of the article.

Benchmark

It is very important for the fact that when it comes to performance tuning, we need to know where we are at and what we want to achieve. During my career, I have seen enough people and including myself that we are trying to optimize the system by modifying a bunch of codes, and the system just 'feels' like running faster without any scientific numbers on the paper.


In our load testing, ignore the first request for the fact that we are initializing the app pool and other bunch of crap that we need to prep for IIS, the average response time is currently at around 8 seconds. Not very impressive!

Another important fact about benchmarking is that we need to set a goal for our performance tuning. I have a goal to take it down to under 2 seconds. Some of my previous big named projects were doing pretty good during Christmas when the local benchmark is at around the 1.5 second mark.

nopCommerce 3.4

nopCommerce 3.4 recently did a performance tuning that boosted the system. Since it is open source, there is no harm for me to have a peek at what they are doing.

I merged some of the code for the CatalogController.Category(). I am so glad to see that they are now refactoring the code in a much nicer way than in version 3.1, much more like a platform now with all the protected virtual methods.

Prior to 3.4, they are caching if a category have any subcategories by using the key CATEGORY_HAS_SUBCATEGORIES_KEY.

In 3.4, they have changed it to cache the actual subcategories by using the key CATEGORY_SUBCATEGORIES_KEY.

This is in fact a very nice move, and was a question that I have been asking for so long. If we bother to cache if we have something or not, why don't we just cache what we have.

Solutions

As usual, I like to take the steps further. There is a lot of calculations and database calls(although already cached like the subcategories above) in the CatalogController.Category() action. I am going to cache the entire CategoryModel used by the action in the cache. The benefit is there is a lot of boxing and unboxing in this method and I am trying to save those as well as the database calls.

Checked in the official forum that they have other concerns for not caching the entire model so that they can cater for wider audience. I don't have that concerns in my business requirement, so I am ready to go for the big cut.

I first refactored the code that gets the CategoryModel called PrepareCategoryModel(). Then I override the methods and add the model to the cache.


Conclusion

By looking at the results side by side, I have to say I am pretty happy with the performance. It is now running 8 times faster than previous; twice faster than what I would have expected at around 1 second.


nopCommerce - Multi Tenancy - Round 2

Multi Tenancy in nopCommerce by itself seems like an on going project for me now. Previously (http://tech.sunnyw.net/2014/05/nopcommerce-multi-tenancy.html), I blogged about how I was able to create brand specific dll in one share code base. (No splitting / branching in Source Control, one code base only). I used MS Build to separate the dlls during compilation which is neat but clumsy, as most developers would overlook these places.

Scope

As previously suggested,
It is not so easy to deploy, as I need to build the project once per brand (so it will generate different dlls)
This technique rely on the developers to build a different BrandedService.dll that the IoC will pick up via IDependencyRegistrar. This gives different brands a slightly different set of dlls as it was hard to maintain.

At the end of this session, we want to achieve,
  • Only build once and use the same set of dlls across all brands.
  • Easy for the developers to deploy.

Code

  • We store a unique id "BrandId" in our Web.config, and of course we will utilize web config transformation for this matter.
  • In the DependencyRegistrar for each brand project, we only register the classes if the brand id matches.
  • IoC will register different concrete classes during reflection (as usual).
  • Brands without matching ids simply will have the register logic skipped (although the IoC will still run the through the class because they all implement the IDependencyRegister.
As demonstrated in code, this is the DependencyRegister for TNF.Services and Speedo.Services.


A snapshot of the bin folder shows the dlls are exactly the same for different tenants.


There will be a redundant TNF dlls in Speedo project and vice versa, but my time is more valuable than a few kb dll, so I think this is a better approach. Removal of redundant dlls will not break the site :)

Nop.Web

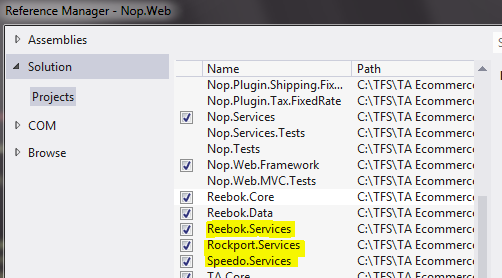
In our web project, we need to voluntarily register all our Brand.Services dll, this will force MSBuild to include all the dlls during build or publish.


Conclusion

Both of these approach have their pros and cons. I am sure there will be other ways doing this too. The key is the developers or the team must be comfortable with the process, and the people doing it are happy about it.

Further Improvement

nopCommerce uses App_Data\Settings.txt to store database connection string. This works fine for staging or live site as we just need to skip App_Data during deployment. However, it became a hassle to swap connection string for local development as web config transformation does not help in this situation. More into this topic next time.


nopCommerce Discount Rules Plugin - Exclude Sale Products

Scope

Create a discount rule plugin that when a user create a discount, they have the option to add requirement whether to include sale products to the discount or not.

We are currently on the latest nopCommerce 3.3 platform, as of today.

How it works

I went through the source code of how other DiscountRules plugin works and concluded the followings:
  • The relationship between Discount and DiscountRequirement is just a one-to-many FK relationship. One Discount have many DiscountRequirements.
  • Any properties such as which customer role is required, or how much dollar value to pass the requirement rule is stored in setting.
  • The setting key is defined within the plugin and transparent from the calling controller / services.
  • In XxxDiscountRequirementRule.cs, we define CheckRequirement() that will return true / false if the requirement is fulfilled. It reads the relevant settings to check the properties such as dollar value or customer roles for passing the discount rule. 
  • The rule file must implement the IDiscountRequirementRule interface.
  • The pattern for how the settings are stored are generally in this format. string.Format("DiscountRequirement.xxx-{0}", discountRequirement.Id)
  • There is an ajax call in the view that does a post back to the XxxController.Configure when saving the DiscountRequirement. 

Steps

Create the project

Following my previous post How to write a nopCommerce plugin I have created a new project called DiscountRules.SaleProduct from other DiscountRules plugin.

Model

I added a boolean property in the RequirementModel to indicate if we want to include sale products.

public bool IncludeSales { get; set; }

View

The project I copied from were using DropDownList, I changed to CheckBox and modified the Ajax call that post back the property to the controller. Make sure to follow the pattern on suffixing the requirement id to the setting, as the screen can have multiple instance of the same rule.


Change the controller name in the ajax post back to match the new plugin name.

Controller

Modified the Configure method to work with the Ajax post back call. Make sure the parameter names match.

XxxDiscountRequirementRule.cs

This CheckRequirement() method is the magic method that we will put our logics in checking sale items in the cart or not, and we will return true / false accordingly to exclude sale products from discount. Hopefully the customers still happy...

Depending on your implementations, the code might look like something below and could be very simple.
public bool CheckRequirement(CheckDiscountRequirementRequest request)
{
    ...

    foreach (var product in cart)
    {
        if (product.SpecialPrice.GetValueOrDefault() > 0
            && product.SpecialPriceStartDateTimeUtc < DateTime.Now
            && product.SpecialPriceEndDateTimeUtc > DateTime.Now)
            return false;
    }

    return true;
}


Troubleshooting

While in debug mode developing the plugin, if you found the plugin not reset properly even after you rebuild the solutions or clear cache. You could try to clear the Temporary ASP.NET Files folder. If you get access denied because it is being used, try delete the w3wp.exe from task manager. That will stop the IIS from accessing it.

nopCommerce - Hello World to Multi Tenancy

Finally, it is about time to do some multi tenant works. Let's recap my goal and how I am travelling so far.

Scope

  • Build a multi tenant e-commerce platform for 15 or more international brands.
  • They are completely different brands and target consumers are completely different.
  • They will share some similarities in terms of functionalities but there will be customizations for individual brands
  • Administrator of a brand can only see stuff about their own brand.
  • Easy to develop
  • Easy to deploy
  • Easy to maintain
  • There is NOT necessary a super admin role to overlook ALL the brands.
  • Customers are NOT shared across brands.

Preparation

So far, I have built my first brand with the above scope in mind, the following strategies were implemented.

Specification

Since our first site went live, we are now ready for our next brand and the following needs to bear in mind with the followings:
  • Separate the brand specific codes in separated dll.
  • Database to be considered at later stage.
  • No brand specific code at controller level.
  • Views for different brands are handled by Nop Theme.
  • We will deploy for all the brands from the same Visual Studio Solutions.

Decision Making

Get Dirty with Code


Project Setup

Notice I am skipping some of the steps and only covering the key points. (eg. Add references, routes, register dependency etc...) They are covered previously.


I created a Misc Service and an interface for our platform.


Then I create brand specific services in the relevant projects.


Build Configuration

With the default Debug configuration, we will clone a set of new build configs per projects. In each build, we only include one brand dll at a time. (Only service dll in this example)


Only for the relevant build configurations of the brand projects, we will set the dll output path to the same as the Nop.Web project.


Controller

We setup a controller that will consume ITAMiscService and return the brand name. Notice how the controller does not have knowledge to the concrete class but only the ITAMiscService interface.


Hello World to Multi Tenancy


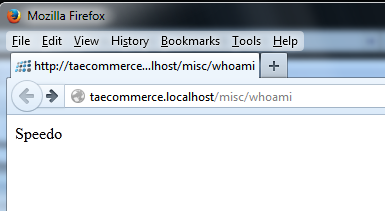
Who am I?

By changing the build configuration, I am able to change my workspace to the corresponding brand.


This is achieved by a MS Build trick.
  • The brand projects are not referenced anywhere (very important)
  • Therefore, when we build Debug, there will not be any brand specific dlls.
  • We used build configurations to trick MS Build to dump the brand dll to the web project for relevant brands.
  • Autofac reflection will pick up the brand dll if they exists, because of the way how Nop Dependency Register works.

Caution

  • Use clean solution in between the building of different brand environments (to delete any brand dlls).
  • Pay attention to the dlls in the Nop.Web bin folder. Occasionally the clean solution do not delete everything in the bin folder. Then we will need to manually clear this folder.
  • Always check Who am I to make sure you are working in the right brand.

Further Improvement

  • It is not so easy to deploy, as I need to build the project once per brand (so it will generate different dlls)
  • Unfortunately in practice, clean solution doesn't always work. For anyone who familiar with MS Build, we could create pre-build event to properly clean up the solutions (instead of relying on Visual Studio)
  • Combine MS Build with PowerShell, we can implement a way to "quick switch" dlls for different brands.

A potentially dangerous Request.Form value was detected from the client

Troubleshoot

A potentially dangerous Request.Form value was detected from the client

One of the error I am getting when performing a form post with HTML tags in .Net.

Solutions

Web.config


One of the StackOverflow 150+ voted answer was this. 

<httpRuntime requestValidationMode="2.0" />

Put this in the Web.config and it will work. It is not my taste to change a site wide config for a form post though. I potentially want to block all other requests that post potentially dangerous HTML tags but except my Simple method.

ValidateInput = false


One of the simple solution available on the net is this. Set ValidateInput to false.


This works, but it potentially allowing the post not to check validation. I think I can still do better!!

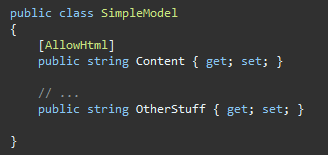
AllowHtml


Potentially, I am setting AllowHtml attribute to a field that I would allow html. Everything else stay away.


nopCommerce - Instantiation of ICacheManager. PerRequestCacheManager not MemoryCacheManager?

Once you started looking into performance, and especially for category page, we would generally looking to cache the result set or page. By coincident, me and my colleague ran into the same problem, so I thought this could be quite common.

Scenario

While trying to implement caching strategy for category page, I found my results and in particular, my FeaturedProducts of the CategoryModel are not being cached while running in debug mode.

As usual, I created my custom controller as follow.


In my controller method, I would check and use the cache if it is available.

Steps In

In debug mode, immediately after the object is written to the cache, the object is in the cache. However, it will ALWAYS return false, and I if I step into the code, the object indeed not in the cache.
This can easily be over-generalised as one of the following without paying closer attention as:-

  • Cache not working
  • Nop is slow
  • Performance Issue

Solution

If we look at what nop provides for ICacheManager, there are 2 CacheManagers (We will ignore the NopNullCache for now) that implement ICacheManager, they are MemoryCacheManager (nop_cache_static) and PerRequestCacheManager (nop_cache_per_request).


As the names suggest, MemoryCacheManager writes objects to memory cache; PerRequestCacheManager writes objects to the session on per request bases.


In Nop.Web\Infrastructure\DependencyRegistrar.cs,  we found the following piece of code.


Without specifying what to register for ICacheManager in IoC, I found by default the PerRequestCacheManager (nop_cache_per_request) is instantiated.

This is an incorrect behavior for my problem as I want to put the content in the memory cache and made available to multi requests over a period of time (until times out).

We need to tell IoC which type of CacheManager we want to instantiate for the interface by using the following code. This will hint IoC to inject a concrete class of MemoryCacheManager to my ICacheManager!!


%5B%5D issue when binding JSON Array to MVC Model


Had some issues during a post back of JSON object from the MVC View to the Controller by jQuery Ajax. To be precise, I am actually using Telerik Control that utilize jQuery Ajax. One of the IList<string> property is not populated in the model.


Troubleshooting


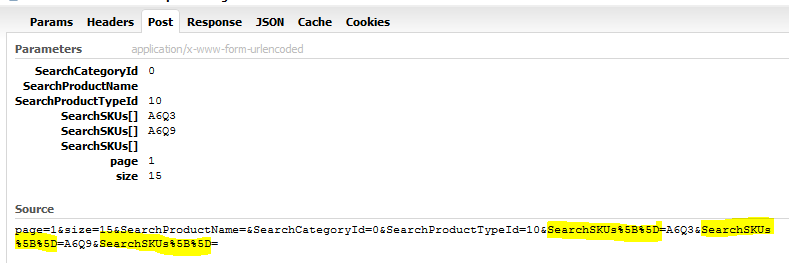
With the help of firebug, the JSON post back of the array has this extra %5B%5D in the name of the fields. Thus MVC framework couldn't map it to the property.


Solution


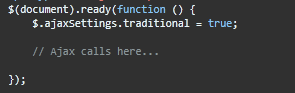
It takes one magic line of code for the JSON post back not to include this extra URL encoded characters in the field name. It is documented in the jQuery API

$.ajaxSettings.traditional = true;


Now the post back is correct and the MVC model can be populated.