Pages - Menu

Mobile App - Hello World to PhoneGap Cordova + Ionic

Scope

We are going to build some apps in Android and iOS, as I have never done that before, I am going to build a really simple Hello World app that would introduce me to the world of apps. 

Prerequsite

Installations

There are quite a few things to prepare before we can even say hello to the world.
There are many options for choice of IDEs. Popular ones are as follow.

Cordova

Create

Firstly we will create the app by using a command line. This will be compatible for Android and iOS by adding the platforms to the app.

$ cordova create HelloWorld com.helloworld HelloWorld
$ cd HelloWorld
$ cordova platform add android

Setup

Setup Environment variable for ANDROID_HOME. This can be found by opening the Android SDK Manager.


Therefore, we will setup as follow.


Build

We will use our Command Line Interface to build our app as follow.

$ cd HelloWorld
$ cordova build android

If you are a little unlucky, you might run into error like this. Error: Please install Android target: "android-22".


This indicates we are targeting an incorrect version of android. We need to change our target in both places.

HelloWorld/platforms/android/project.properties 
HelloWorld/platforms/android/CordovaLib/project.properties

It will look like this if built successfully.

Test

As part of the Android SDK installation, it comes with the Android Virtual Device (AVD) Manager.

Choose Device Definition and Click Create AVD.


We will launch the AVD that we just created, and deploy our app to the emulator by running this command.

$ cordova run android

If everything ran smoothly, by default it should load up the Cordova Device Ready page from our /HelloWorld/www/index.html


Hello World

Before we begin, we will need to pick a mobile framework to work with. I have chosen the Ionic Framework.

Firstly, we will install the packages.

$ npm install -g cordova ionic

Then, we will scaffold our site.

$ ionic start HelloIonic blank

Similar to our Cordova commands, we can build and run our apps in Ionic commands.

$ cd HelloIonic
$ ionic platform add android
$ ionic build android
$ ionic run android

This time, we have a default page from the Ionic framework.


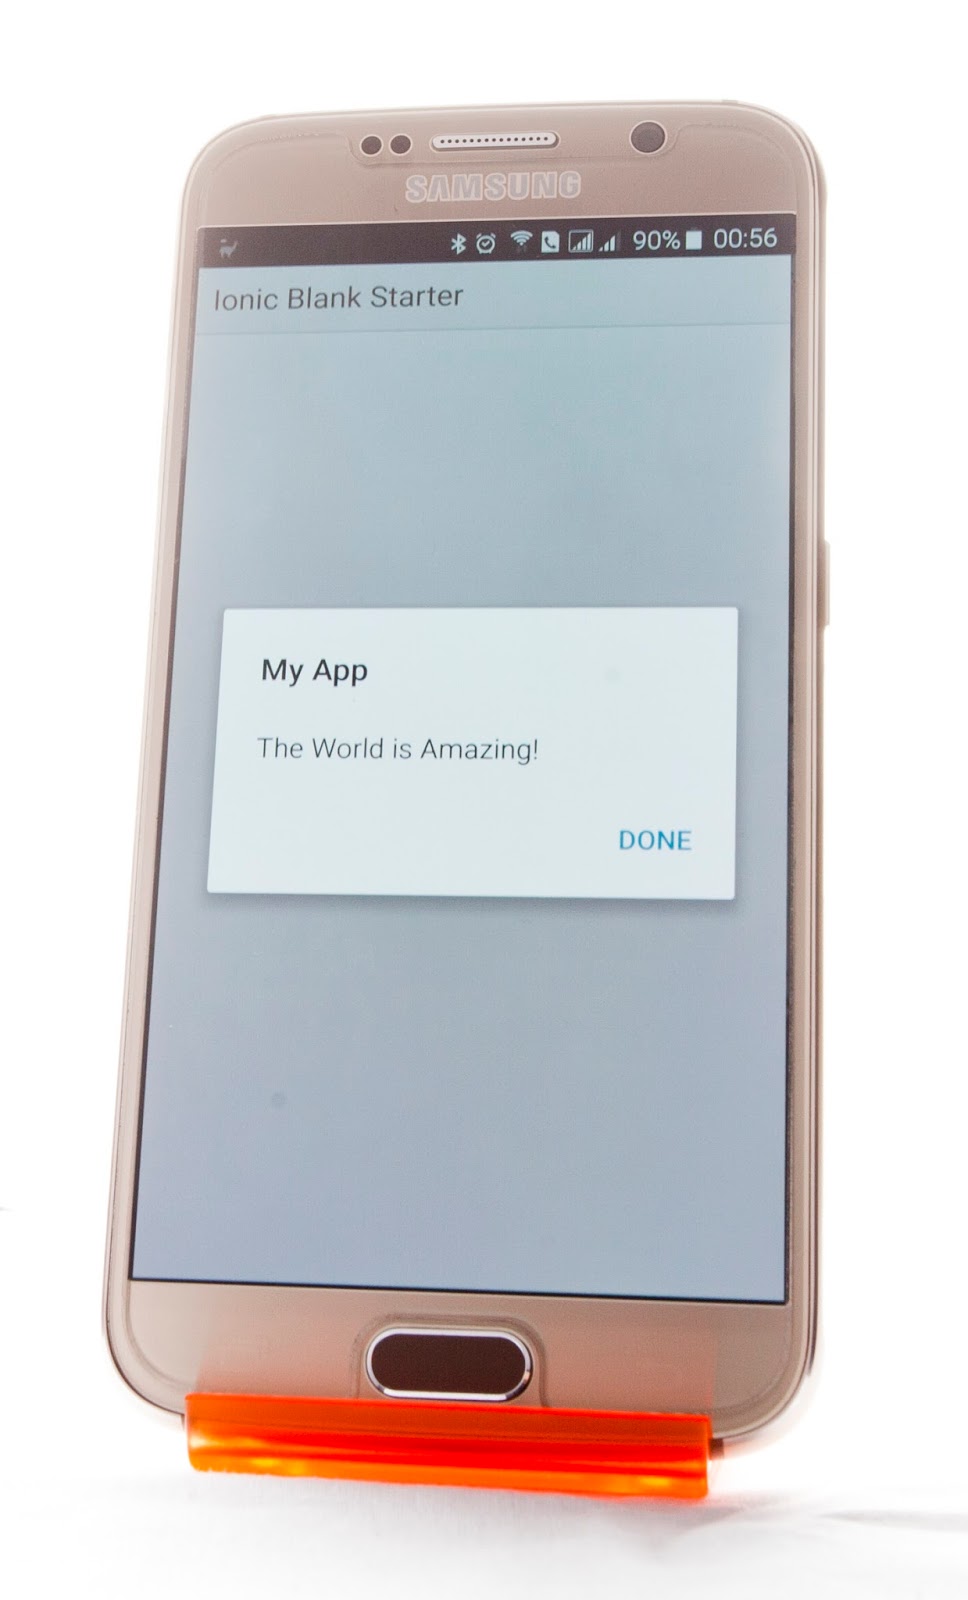
We are going to create some simple notifications. There are infinite ways of doing it. The most simplist form will be this.

alert('Hello World!');

However, we have not much control with the default alerts. The next step for me is to utilize some available plugins to do a bit more customizations. eg. https://github.com/apache/cordova-plugin-dialogs

function alertCallBack() {
 alert('Hello World');
}

navigator.notification.alert(
 'The World is Amazing!',  
 alertCallBack,  
 'My App',       
 'Done'          
);

The first message pops up is 'The World is Amazing!', then a callback function is invoked when the message is dismissed, so the alert message 'Hello World' will pop up.


USB Device

We can run the app not just on emulator, but a USB connected device as well.

Firstly, we will need to setup our device for development.

For my Samsung device, I needed the extra Windows drivers which I was hardly able to find from within the Samsung support page, but with a bit of googling, I found the hidden gem in their developer site.


After installing the drivers, we can connect our device to the computer via USB, we can test if our device is available for debugging purpose by running an adb (Android Debug Bridge) command.

$ <android-sdk>/adb.exe devices


The device is now visible to us and we are just one step away. On our device, we need to authorize our computer for USB debugging. After connecting our device to the computer, a similar screen should popup on your device.


We will run our adb command again. This should now say device after it is authorized.


With our Ionic commands, we can now explicitly specify to run our app in our device.

$ Ionic run --device

It will install and run the app in our USB attached device.


Conclusion

How about iOS? It happens that iOS can only be done in OS X and I don't have any. I tried to add the iOS platform in Cordova with my Microsoft machine, and I got the error as follow. There are some hackintosh way that I could get around the Apple issue, but I will leave that for another project next time.


Took me awhile to get there, but it is all worth it. As a web developer, I am now able to use my existing web knowledge to start building multi-platform mobile apps.

nopCommerce - AWS Migration

Scope

We are moving our existing websites to AWS EC2. From a high level perspective, our plan as follow.
  • Move the websites to EC2
  • Move the database to RDS
  • Content Images upload via CMS will go to s3
  • Product Images on the websites are moved to s3
  • Move the console apps to a t2.micro instance
We are using nopCommerce 3.3.

Implementation

Websites and Console Apps

Moving sites and apps to cloud instances are pretty straight forward. There are no code changes required in nopCommerce.

Database

We used the SQL Database Migration Wizard tool, pretty straight forward.

S3

Migration to S3 required some code changes, but we are not getting much resistance because of the advantage of using OO and polymorphism.

Previously we already wrote a custom class that inherit from the PictureService.

public class TAPictureService : PictureService, ITAPictureService, IPictureService

Now, I can inherit my custom class by my new AWS class.

public class AwsPictureService : TAPictureService, ITAPictureService, IPictureService

We will then override the image read / write method to connect to AWS. This was mentioned previously in my other post Amazon SDK S3 with .Net

In our DependencyRegister, we now register our new AWS Service.

builder.RegisterType<AwsPictureService>().As<IPictureService>();

Now my system is able to support either local or S3 images by changing the register type via DI.

How to remove all namespaces from XML with C#?

Scope

How to remove all namespaces from XML with C# is a commonly found questions in developments. It is not the best practice to remove the namespace and I see it as an anti-pattern to remove it rather than utilizing it, but there are cases that this can be an 'acceptable' solution.

One of the example could be this - Converting a DTD / XSD to strongly typed C# class

In this scenario, I was working with multiple servers that their returning namespaces are different each time, and the serializer fail to validate the namespace. Given the return xml is only so short lived and it was not worth the effort to implement multiple or dynamic namespaces.

Solutions

After looking up the stackoverflow, I was a little surprise that the first few answers seem to have issues with attributes being remove. They did not seem to serve the purpose of what they were asking - A clean, elegant and smart solution to remove namespacees from all XML elements.

Since no working solutions are available to me, I had an attempt to write my own as follow.

public static XElement RemoveAllNamespaces(this XElement element)
{
    return new XElement(element.Name.LocalName,
        element.HasAttributes ? element.Attributes().Select(a => new XAttribute(a.Name.LocalName, a.Value)) : null,
        element.HasElements ? element.Elements().Select(e => RemoveAllNamespaces(e)) : null,
        element.Value);
}

And I have tested the code with the following XML that have multiple level of nodes and attributes.


The 4 liner solution all serve it's purpose.

  1. Firstly, it creates the root node
  2. Appends all attributes
  3. Append all elements 
  4. Lastly, the value


The trick is in line 3, where it picks all the elements() and pushed back to it's own function from the current element. Thus, recursively doing the same thing for all the nodes.

The magic for it to work is the elegant way of how the XElement constructor works. I often found using XElement will end up with a 1 liner solution because of it's constructor, so a good coding style and line breaks will really help the next person who read your code.

Did my solution look clean, elegant and smart to you? Share your thoughts :)

Converting a DTD / XSD to strongly typed C# class

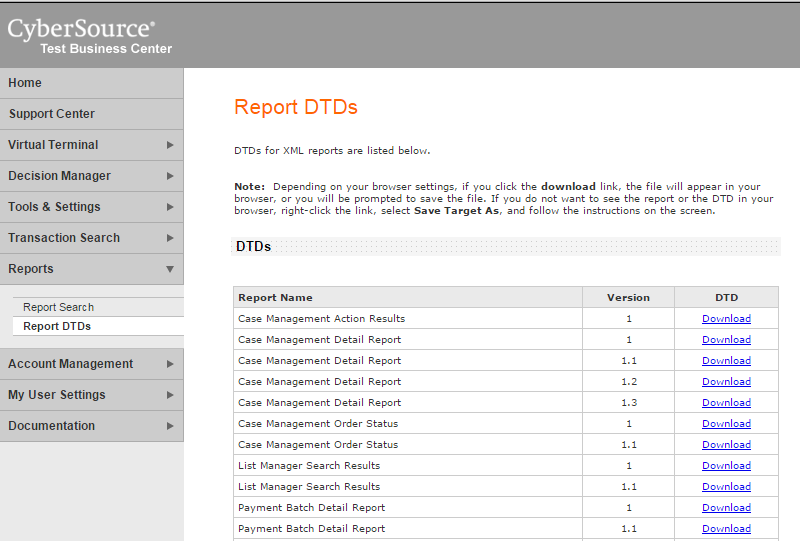
We are looking to implement some CyberSource Reporting functions that our system will be able to poll CyberSource for various reports, and call different actions base on the result. After going through the documentations, we know the CyberSource portals are providing us the DTD definitions.

Prerequisite

Implementation

Firstly we will need to download the DTD from the CyberSource portal.


We want to generate the strongly typed model class from the DTD definition, but we will need to convert this into XSD first. This can be done the XML Create Schema function via Visual Studio.


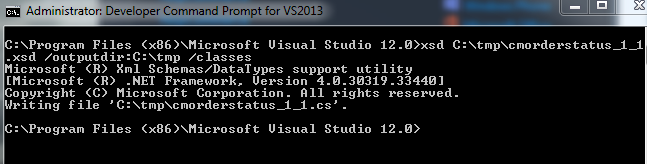
We are now able to generate the C# class by using the XSD.exe. It is available via the Visual Studio Developer Command Prompt.


The generated file will look something like this.


Troubleshooting

[System.InvalidOperationException]: {"<xxx xmlns='some_uri'> was not expected."}

During developments, we got an exception of "There is an error in XML document (0, 0)." and the inner exception is "<Report xmlns='https://ebctest.cybersource.com/ebctest/reports/dtd/cdr.dtd'> was not expected."

This is due to the DTD that we downloaded had a namespace of vendor's live site, therefore our strongly typed class has a name space of the live URI too. However when we are connected to their sandbox, throws an exception as the namespace didn't match.

One approach would be dynamically changing the namespace according to our connections, but I chose an easier way.

Firstly, I removed the namespace from the System.Xml.Serialization Xml Attributes in our generated strongly typed object class.


We will also need to remove the namespace from the incoming xml before we do any deserialization. This can be achieved by creating an extension method to recursively remove all namespaces from all nodes.
private ConversionDetailReport GetConversionDetailReport(string xmlString)
{
    var serializer = new XmlSerializer(typeof(ConversionDetailReport));

    var xDoc = XDocument.Parse(xmlString);

    var xr = xDoc.Root.RemoveAllNamespaces().CreateReader();

    return (ConversionDetailReport)serializer.Deserialize(xr);
}

TFS - Undo a Resolve Conflict During a Merge

Scope

Merge from projA to projB

Our IDE is Visual Studio 2013 and we use Visual Studio Online TFS as our repository.

As our projects grow in omni-direction with developments going on in multiple branches in TFS, I was trying to perform a merge between 2 projects and had some problems in trying to undo resolved conflicts. After I resolved the conflicts and before I commit any changes, there is no option for me to undo any resolved conflicts.

Furthermore, I have also tried the following and none worked for me. Visual Studio still assumes conflicts are resolved even though I did not check in anything.
  • Undo Pending Changes then Merge again. 
  • Delete the working folder, Get Latest then Merge again.
  • Use a different version of Visual Studio then Merge.
  • Shelve changes and Merge again.
  • Delete the working folder. Create a new Workspace with different local folder mapping.
  • Repair (reinstall) Visual Studio.
  • Login with a different account on a different machine.

Solution

After learning that a different login and machine would not solve my problem, I know I am now in serious troubles. It doesn't make much sense that the conflict resolution is recorded anywhere else outside of my computer without me check-in anything, but now it seems the only logical way to think it is happening.
Instead of merging from projA to projB again, I now made a clone of projB by branch out projB to projB-Clone.

I then merge from projA to projB-Clone and I am now getting my Resolve Conflicts screen with x number of conflicts pending my action. After resolving my conflicts, I now need to commit my changes to projB-Clone.

In our projB-Clone, we have all the merged code from projA after the previous merge, we are now ready to merge this changes to projB. As anticipated, there should not be any conflicts, we are literally just copying / replacing files from projB-Clone to projB.

Finally I will merge projA to projB once more to check if they are identical and no conflicts. From this point, we have completed our original attempt of merging projA to projB and it is now safe to delete projB-Clone.

Merge from projA to projB via projB-Clone

Thoughts

It is an unresolved mystery why TFS records conflict results on the server where there were no check-ins or commits. I never had similar issues in other file repository like SVN. The 4 way operations to work around an undo resolve conflicts button? Certainly not appreciated.

Amazon SDK S3 with .Net

Scope

We decided to move our images on our websites from local drive to Amazon S3. This includes all our product images from the e-commerce side; as well as any images or videos that are associated to the CMS side.

Setup and Installation

AWS Toolkit for Visual Studio

  1. Follow the Amazon Setup Guide to install the AWS Toolkit
  2. Download and install (or NuGet) AWS SDK for .Net.
  3. Configuring AWS Credentials
  4. Use the Amazon Endpoint List to configure the end point
  5. The Amazon SDK API documentation is pretty easy to read.

Code

Upload an object

By using the Amazon SDK, We change our file service to put files to S3 instead of saving to local folder. It divides into 2 parts. We will prepare the PutObjectRequest and call AmazonS3Client.PutObject() to upload the file.

public override HttpStatusCode UploadPicture(string targetPath, string sourcePath)
{
    // Create a PutObject request
    var request = new PutObjectRequest
    {
        BucketName = bucket,
        Key = targetPath.ToLower(),
        FilePath = sourcePath,
        CannedACL = S3CannedACL.PublicRead
    };

    try
    {
        using (var client = new AmazonS3Client(Amazon.RegionEndpoint.APSoutheast2))
        {
            // Put object
            PutObjectResponse response = client.PutObject(request);

            return response.HttpStatusCode;
        }
    }
    catch (Exception ex)
    {
        // logging and exception handling....
    }

    return HttpStatusCode.NotFound;
}

S3CannedACL is a predefined Access Control List that allows access to be set on S3 objects.

Access an object

To access an object in s3 is much easier. You will just need to know the url and have the correct ACL setup.

The URL format is in a form of http://{mybucket}.s3.amazonaws.com/{mykey} 

mybucket is the bucket name and mykey is the key (file path) to the object.


The Quickest Way to Bulk Create AWS S3 Buckets

I am in a mission of creating a bunch of s3 buckets in bulk. I could just use the web interface and do it manually. I reckon I can get the job done in around 30 minutes, but I am looking for a more an IT way to do it.

Solution

After a quick look around, I think I can use the Command Line Interface.

Download and Setup


Configure


Run the aws configure command to create a default profile. Fairly straight forward.

$ aws configure
AWS Access Key ID [None]: AKIAIOSFODNN7EXAMPLE
AWS Secret Access Key [None]: wJalrXUtnFEMI/K7MDENG/bPxRfiCYEXAMPLEKEY
Default region name [None]: us-west-2
Default output format [None]: json

A list of region name can be found here.

Commands


http://docs.aws.amazon.com/cli/latest/reference/s3/index.html

I use the ls command to pull out a list of my buckets.

$ aws s3 ls

In order to create buckets, the command I need is mb.

$ aws s3 mb s3://mybucket

I prepared my list of commands by using Excel / Find and Replace.

$ aws s3 mb s3://sunnyw.net.dummy1
$ aws s3 mb s3://sunnyw.net.dummy2
$ aws s3 mb s3://sunnyw.net.dummy3

And I just copy and paste into the console.

PS C:\Program Files (x86)\AWS Tools\PowerShell\AWSPowerShell> aws s3 mb s3://sunnyw.net.dummy1
make_bucket: s3://sunnyw.net.dummy1/
PS C:\Program Files (x86)\AWS Tools\PowerShell\AWSPowerShell> aws s3 mb s3://sunnyw.net.dummy2
make_bucket: s3://sunnyw.net.dummy2/
PS C:\Program Files (x86)\AWS Tools\PowerShell\AWSPowerShell> aws s3 mb s3://sunnyw.net.dummy3
make_bucket: s3://sunnyw.net.dummy3/
PS C:\Program Files (x86)\AWS Tools\PowerShell\AWSPowerShell>

I didn't need any fancy API calls or build any C# console. If the requirement was more complicated, I could put those logics in PowerShell script. Simple is Good!!