Pages - Menu

CyberSource - The Magic Line(s) for Authorize and Capture

Scope


Working on integration with the CyberSource payment gateway that does direct payment (non-hosted option) on our online shop. Using the latest API version 1.93 as of today the article is written, and I followed their instructions and created a SOAP based WCF to connect to their Test Business Center (sandbox).

Problem


I followed copied their sample code, fiddle around to get it compile and submit the transaction with no error.

However, when I login to the test center, I only get authorize but not capture.

auth

(Authorize and Capture is explained in the CyberSource KB.)

Try to search around and finally find this pdf file. On page 176, it clearly explained on how to "request a sale". However, don't get so excited yet, it doesn't work if you just copy and paste the code. That's because they mix the documentations between their old Simple Order API Call and the SOAP API Call.

The 2 magic lines you need to get capture working (and authorize at the same time, essentially we are doing sale) as follow.

magic

Run the code and back to our sandbox, it is now trying to authorize and capture in the same transaction. Notice the green means successful, the red authorization in 2nd row stopped the transaction to proceed for capture, therefore it is neither red nor green color.

sale

Conclusion


It was a no brainer to work out the magic line(s) for the problem if you read the sample code carefully. I only wishful thinking that they would have put these 2 magic lines in the given sample code but I had my fun on a bit of code hunting and reading documentations today. Surely a better understanding of the CyberSource Payment Gateway.

nopCommerce Customization with Controller Inheritance

Scope


The following article is based on the latest platform of nopCommerce as of today, version 3.1.

Scenario


Trying to customize the view by adding some extra custom text, the goal is ideally we will not change the existing controller in the nopCommerce platform to allow easier future upgrade.

Normally, we will create a widget plugin to do that, nice and neat that plugin is isolated from the page controller and allow easy plug and play. This would work fine for most people.

However, in certain scenarios, if the works required to be done in the controller is more complicated like introducing new services, security control etc, then we will need to modify the controller.

The gotcha is we don't want to change the existing controller for future upgrade, with IoC and OO architecture, one would think it is easy just to create a new controller to inherit from the existing controller for custom works, but life is not that easy.

Customization


CoreController

In CustomerController, we need to set the Register() as virtual. And that is only change required in our core controller, so that you can override its functionalities.

VirtualRegister


CustomController

Let's take CustomerController as an example and I want to override the Register().

I created my own CustomerController file inside a folder called Custom.

 CustomerController in Explorer

I gave it a namespace of Nop.Web.Controllers.Custom, and inherit from the Nop.Web.Controllers.CustomController.

controller

You will need to set your constructor same as the parent controller, and use the keyword base to inherit from the base controller, pretty standard C# inheritance syntax.

constructor

You may override the Register() like the following. In this example, we changed the value of the ViewBag.Title only, but as you can imagine, you can initialize new objects or call other services, all be achieved.

OverrideRegister

RouteProvider

RouteProvider

In the Nop.Web project, Infrastructure\RouteProvider.cs, we need to map the controller to a different namespace, so our custom controller will be used in place of the parent one.

RouteProvider Custom

View

For demonstration purpose, I updated the view as follow, but a more professional way by using theme can be found here.

view

Result

Compile the solution and head to register page, it should look like this.

result


IoC

What about IoC? How will the CustomController get instantiated? That is already handled by the Nop.Web.Framework.DependencyRegistrar that will register all controllers in the assembly.

Conclusion


As demonstrated, it is not horribly difficult to do customizations in nopCommerce, I only wish it could be easier with the RouteProvider part where I can instead just use the IoC to change the constructor only, then the Visual Studio would be smart enough to pick up the custom controller during compilation.

nopCommerce Plugin - The partial view was not found

In an attempt of creating a new plugin, we have the following standard nopCommerce views and a "shared" view.

solutionexplorer

When dealing with view, I ran into an error like below where it cannot find the view for the plugin.

viewerror

In visual studio, view created by default with Build Action set to Content. This needs to be changed to Embedded Resource.

viewresource

The partial view also needed to be referenced by giving the fully qualified name space in the calling view.

FQ

How to write a nopCommerce plugin - Hello World

Scope

This is an article to discuss and may resolve the "does not implement IController" error. It gives a walk thru on how to write a NopCommerce plugin with the NopCommerce 3.1 framework.

Introduction

If you are new to NopCommerce and about to write a NopCommerce plugin, the likelihood is that you might have read this article already.

If you are then lucky enough to get the infamous "does not implement IController" error, with a bit of google, you would have landed and read this article.

1

If you are then still having the same error, unable to resolve the problem even followed all the suggested solutions by others like "pad a space to global.asax" etc, then the rest of the article is for you.

Project Setup

In this example, it is a quick walk thru on how to build  a not so simple Hello World widget plugin.

If you read the above how-to article, they suggested you to start a new class library project, but I found copying an existing project will save you from the mysterious "does not implement IController" error.

To begin, I made a copy of the Nop.Plugin.Widgets.NivoSlider plugin that is part of the framework and gave it a new name.

Things that I then need to modify are as follow:-

Project Properties

Change the output path and file name.

2

3

Properties\AssemblyInfo.cs

Fairly straight forward. And for the sake of completeness, I generated a new guid and replaced the one I copied (although I am not going to expose the dll to COM)

References folder

The good thing about copying an existing project is I can leave this untouched.

Description.txt

Fairly straight forward.

HelloWorldPlugin.cs

We will return "hello_world" in the GetWidgetZones(). This name will match the widget in the view that use this plugin later on, so the widget will be rendered in the desired place. The rest is pretty self explained from the comments.

widgetzone

HelloWorldSettings.cs


We will have 2 fields, to store greeting and name.

code

Controller

Following the same naming convention, we will call it WidgetsHelloWorldController.

In the constructor, we only need ISettingService, IStoreContext, IStoreService, IWorkContext.

controller constructor


The 3 main actions in this controller are Configure(), Configure(configurationModel) and PublicInfo(widgetZone).

Configure is for the configuration page in the admin; PublicInfo is the actual rendering of the plugin in the front end.

Fairly similar to the NivoSlider code so I won't go into details.

Configure

Configure(Model)

PublicInfo

Models

Similarly,

ConfModel

PubModel


Make sure the namespace is correct or it will throw runtime error.

Views

The Configure.cshtml view is quite a straight forward exercise of find and replace / code chopping.

The PublicInfo.cshtml view will display the message.

publicview

Hello World

We are now nearly there to greet the world.

Admin

Go thru the process and install the plugin, then enable it.

install

Click on the configure button and depends on your multi-store setup, you might get this.

admin conf


Values can be stored site-wide or store specific, I will leave the fun parts for you to explore.

Front End

For demonstration purpose, we need to inject this widget / plugin into an view so it can be rendered in the front end. In this example, I picked the cart.cshtml view, you can find this in the Views\ShoppingCart as part of the NopCommerce platform.

We will add a line to indicate where we want the widget to go in the view.

cart


And it should look like this.

hi

Conclusion

The way how plugins are created were not so developer-friendly. It takes a lot of copy and paste works and some of the error messages are not so friendly neither. Nevertheless, it is a nice platform that allow you plug and play different plugins, install / uninstall / enable / disable. The multi-store ability with the plugin greatly helped reduce development times where in some platforms you maybe hacking your way until you can't hack further. I am looking forward to see what NopCommerce will evolve into in the future.

Setup NopCommerce in Development Environment

Download the source from NopCommerce

http://www.nopcommerce.com/downloads.aspx

Open the solution, set Nop.Web as default and build.

Capture4

In IIS, setup website and point to the Nop.Web folder.

Capture5
We need to change the App Pool to use .Net 4 under Advanced Settings.


Open the site in the browser and should see the following:-

Capture3

Go thru the wizard and we are done!!

Setup Jenkins on TFS 2008 for MSBuild project

Installation

Download TFS plugin from https://wiki.jenkins-ci.org/display/JENKINS/Team+Foundation+Server+Plugin

Download MSBuild plugin from https://wiki.jenkins-ci.org/display/JENKINS/MSBuild+Plugin

You may go to the jenkins-ci wiki page to download the plugin manually or it can be downloaded via Manage Plugin page, either way is fine.

Install plugin under Manage Jenkins.


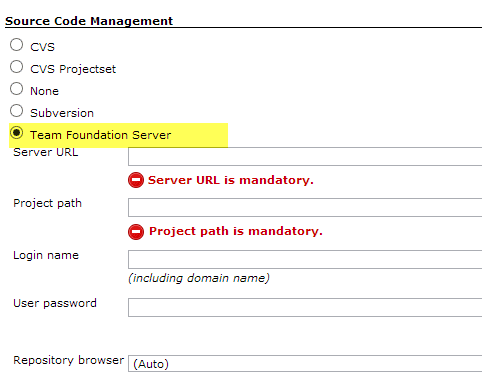
Now TFS is available as an option in Source Code Management.


Plugin can also be found and installed by using the plugin manager.


Troubleshooting during installation


The following error maybe encountered if TF.exe is not installed or path to access TF.exe is not configured in Jenkins.
Started by user anonymous
Building in workspace C:\Program Files (x86)\Jenkins\jobs\XXX\workspace
[workspace] $ tf workspaces -format:brief -server:tfs.server.com ********
java.io.IOException: Cannot run program "tf" (in directory "C:\Program Files (x86)\Jenkins\jobs\XXX\workspace"): CreateProcess error=2, The system cannot find the file specified
 at java.lang.ProcessBuilder.start(Unknown Source)
 at hudson.Proc$LocalProc.<init>(Proc.java:244)
 at hudson.Proc$LocalProc.<init>(Proc.java:216)
 at hudson.Launcher$LocalLauncher.launch(Launcher.java:773)
 at hudson.Launcher$ProcStarter.start(Launcher.java:353)
 at hudson.plugins.tfs.TfTool.execute(TfTool.java:99)
 at hudson.plugins.tfs.model.Server.execute(Server.java:47)
 at hudson.plugins.tfs.model.Workspaces.getListFromServer(Workspaces.java:38)
 at hudson.plugins.tfs.model.Workspaces.populateMapFromServer(Workspaces.java:50)
 at hudson.plugins.tfs.model.Workspaces.exists(Workspaces.java:76)
 at hudson.plugins.tfs.actions.CheckoutAction.checkout(CheckoutAction.java:36)
 at hudson.plugins.tfs.TeamFoundationServerScm.checkout(TeamFoundationServerScm.java:175)
 at hudson.model.AbstractProject.checkout(AbstractProject.java:1408)
 at hudson.model.AbstractBuild$AbstractBuildExecution.defaultCheckout(AbstractBuild.java:676)
 at jenkins.scm.SCMCheckoutStrategy.checkout(SCMCheckoutStrategy.java:88)
 at hudson.model.AbstractBuild$AbstractBuildExecution.run(AbstractBuild.java:581)
 at hudson.model.Run.execute(Run.java:1603)
 at hudson.model.FreeStyleBuild.run(FreeStyleBuild.java:46)
 at hudson.model.ResourceController.execute(ResourceController.java:88)
 at hudson.model.Executor.run(Executor.java:247)
Caused by: java.io.IOException: CreateProcess error=2, The system cannot find the file specified
 at java.lang.ProcessImpl.create(Native Method)
 at java.lang.ProcessImpl.<init>(Unknown Source)
 at java.lang.ProcessImpl.start(Unknown Source)
 ... 20 more
Finished: FAILURE

The missing file can be downloaded in here.

http://www.microsoft.com/en-us/download/details.aspx?id=16338

Install in progress….


The following error maybe encountered if path to TF is not given.


The next step is to tell Jenkins where TF is. In Jenkins –> Configure System, depends on the version of .Net Framework, apply the path as follow.


Setup for MSBuild Project

Once the Jenkins is setup, by default it is only getting the files. The next step is to setup the MSBuild for the project.


In [Project] –> configuration –> Build –> Add build step, we will setup as follow.

Add build step will now have an option to use MSBuild.


As described in the jenkins-ci wiki page, we need to configure the MSBuild. A simple setup for .Net framework 4.0 as follow.


Trigger a build from check in

Perhaps, one of the most interesting feature of CI is the ability to continuously ensure the integrity of the build. Hence the name continuous integration. With the ability to trigger a build from any check-ins from developers, we have immediate feedback if any piece of check-ins causing troubles. This can be achieved by polling the SCM periodically. The online help with Jenkins is quite comprehensive, it follows the cron syntax.


The “quickest” steps to refresh complex entity type in entity framework


  1. Go to .edmx diagram

  2. Right click -> Update Model From Database

  3. image

  4. From Model Browser, go to Function Imports folder, right click Edit the sproc that needs update.

  5. image

  6. Click update on Complex

  7. Click Get Column Information –> OK

  8. image

  9. Make sure to Run Custom Tool on the EF again :(