Pages - Menu

Showing posts with label Continuous Integration. Show all posts

Bitbucket Continuous Integration with Bitbucket Pipelines

Scope

We use Bitbucket as our SCM and other few Atlassian products in our development team. Happy to say that I am pleased with the tools that it made our daily works very productive and hassle free. 

Recently, I am looking into a CICD solution for our deployment process. I have already previously Setting Up Jenkins for GitHubSetting Up Octopus Deploy for Jenkins with nopCommerce Projects or Setup Continuous Integration with Visual Studio Online. I like the design of Octopus Deploy, but given we are now happily living with our Atlassian suite, I want to see what the Bitbucket Pipelines (formerly Bamboo) can offer me. 

I just signed up for the Bitbucket Pipelines Beta and already received the beta invitation within about 6 hours :)


Goal

  • Setup and integrate Bamboo with Bitbucket.
  • Explore possibility to automatically run the Demandware Grunt Build Suite when we commit to master.

Setup

I clicked the link to install the Bitbucket Pipelines add-on.
Went through a simple setup procedure and enabled it in my repository.


It adds a Pipelines link in my repository.

Going through the wiki to configure the bitbucket-pipelines yml.

It is essential to understand the Docker Image used by Bitbucket pipelines. The default image uses ubuntu and is good enough in our scenario.

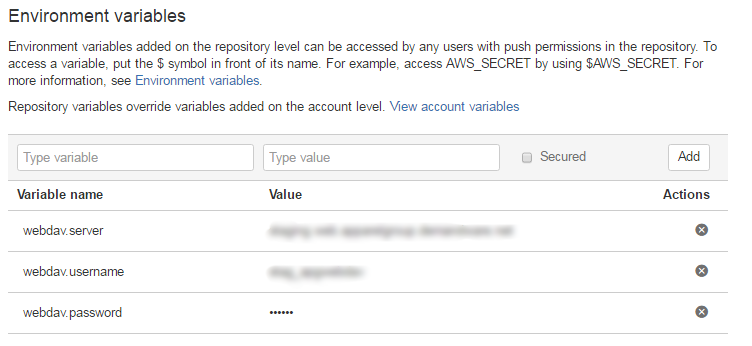
In the setting tab, we are able to setup environment variables for username and password.


We created a bitbucket-pipelines.yml script in the root folder.


Check-ins to the master will trigger the Bamboo to run the build job and script.


Thoughts

I have not had much chance to explore further, but it looks quite promising and does what I wanted. I like the fact that it is tightly integrated with our bitbucket so I do not need to login to another service, the setup was simple and straightforward.

"Build servers build" - Bitbucket Pipeline is a CI server and not a CICD server. We will leverage Bitbucket Pipelines for our continuous integration and our Demandware Business Manager for deployment purpose. I am pleased with the Bamboo Pipelines, this should work well and fits in our CICD strategy.


Moving Jenkins from One Machine to Another Machine

Moving Jenkins

Moving Jenkins from one machine to another machine was fairly straight forward, it is pretty much just a copying the folder from one machine to another and is documented in the Jenkins Wiki

java.nio.file.DirectoryNotEmptyException

The migration was smooth. I followed my previous post to move our Jenkins server to another instance, and we only get one console error related to the migration.


In the JENKINS_HOME\jobs\JOB_NAME folder, I am manually deleting the builds\lastSuccessfulBuild and builds\lastStableBuild folders, and Jenkins is happy building again :)

Setting Up Octopus Deploy for Jenkins with nopCommerce Projects

Scope

After our previous success at setting up our Jenkins build server, we are now looking into an automatic deployment process for our nopCommerce projects by using Octopus Deploy.

Octopus Deploy

Octopus Deploy installation is straight forward and the wiki page is very detailed.

After setting up our server and tentacles, we have to bundle our artifacts into NuGet packages for Octopus Deploy to consume.

NuGet

NuGet Spec

Firstly we will initialize a nuget spec file for our project by running a command from my project folder.

NuGet Pack

Personally, I prefer to use NuGet Pack to do all my packagings as that will give me more power and better control. Unfortunately I ran into this issue that is related to the way how nopCommerce structure their project folders and I cannot change.

It is a misfortune that I have to combine the build process and packaging process into one command, I would have preferred to use NuGet Pack in a separate process for better granularity control and easier for troubleshooting. Life is imperfect and I am resort to my second option - OctoPack.

NuGet Explorer

NuGet Explorer is a tool that can examine the .nupkg NuGet packages. It is a very helpful tool that we can troubleshoot what is in the package content.

OctoPack

From Visual Studio, we installed OctoPack via NuGet on our Web Project only. 


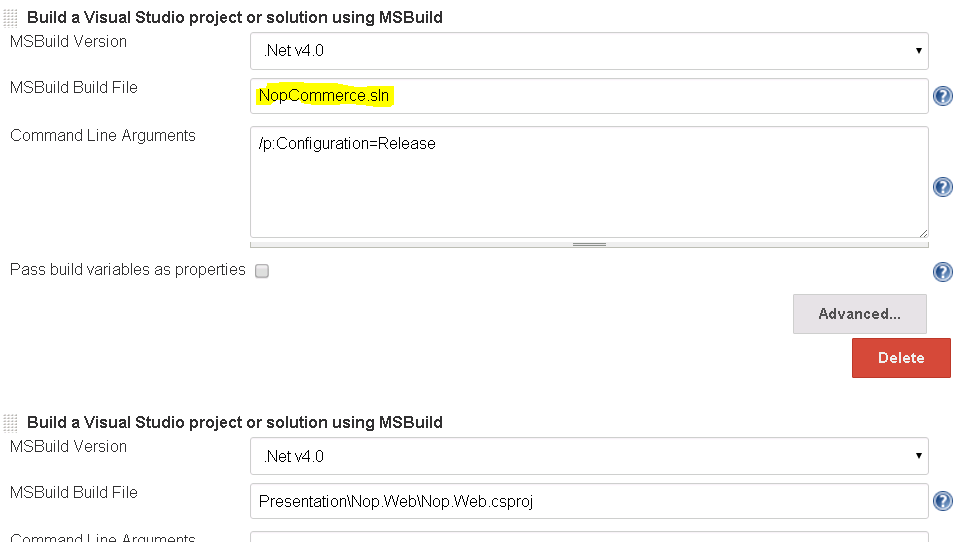
In our Jenkins build server, we created a new job that only responsible to build the artefacts. It is similar to the existing build only job, but with extra parameters in the MSBuild command.


This will trigger the OctoPack to run, using the Release Configuration in .Net, and uploading the package to our Octopus Server package folder by using an API key.

MSBuild .\NopCommerce.sln 
  /p:Configuration=Release 
  /p:RunOctoPack=true 
  /p:OctoPackEnforceAddingFiles=true 
  /p:OctoPackPublishPackageToHttp=http://yourUrl/nuget/packages 
  /p:OctoPackPublishApiKey=API-YOURAPIKEY

The packages will became available in our Octopus Library.


In our Jenkins Server, we ran into an issue that any builds afterward will always fail and the error message is related to OctoPack.

Pushing Nop.Web 3.3.5791.28374 to 'http://octopus/nuget/packages'...

  Failed to process request. 'Bad Request'.

EXEC : The remote server returned an error : (400) Bad Request..

If I delete the package from the Octopus Library and a build will work again.

To resolve this, we need to increment the version number every times we build an artefact. The easiest way to do this is adding an OctoPack switch in our MSBuild command.

/p:OctoPackPackageVersion=3.3.${BUILD_NUMBER}

nopCommerce

One of the biggest challenge in this exercise is not just about Octopus Deploy but to get it to work with the nopCommerce. As I mentioned before, the nopCommerce structure is not NuGet friendly and the underlying technology of OctoPack is by using NuGet Pack anyway, so while I was able to dodge a few bullets get things moving, but I still have to resolve some of the known issues.

I downloaded the nopCommerce 3.6 stable version and tried to pack it and get the following.


It is noticeable that there are many missing files.

  • Administration folder
  • Nop.Admin.dll (from the bin folder)
  • Plugins folder

The reason is because we are just building the Nop.Web.proj. The Nop.Admin.proj is a standalone project as well as all the plugin projects.

There are different approaches to this but I chose the easiest one just to get things going.

  • Include the Nop.Admin project as a reference in the Nop.Web project.
  • Add an extra step that builds the NopCommerce.sln. This will pre-build all the plugins into binaries.
  • Manually include the missing folders in nuspec so they get picked up during the NuGet / Octo Pack process.


Web Config Transformation

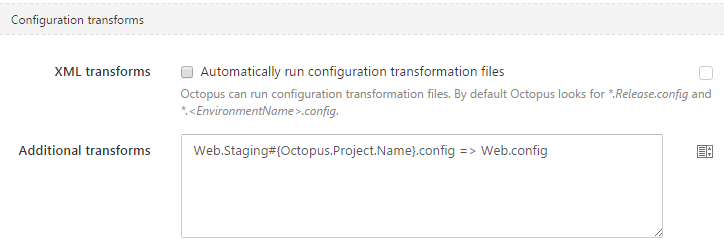
In Octopus Deploy, we are allowed to a web config transformation after we deploy. I have my project name set up that aligned (beautifully) with our project names in Visual Studio, so that I can use the Octopus Variables when I perform transformation like this.

Web.Staging#{Octopus.Project.Name}.config => Web.config


During the transformation, we ran into the following error.

No element in the source document matches 'my_config_keys'

The error is saying a key my_config_keys is in our Web.StagingReebok.config but not in Web.config. Octopus tries to transform the key into Web.config and thrown a null exception.

Multi Tenant

Multi tenant support is not yet available in Octopus Deploy 3.2, According to roadmap, it should be available in 3.3.

In the meanwhile, Octopus Deploy documented 2 possible ways to implement the deployment strategy in a multi tenant environment. I chose the "project per brand" because I have a staging environment for each brands and it is messy to put all machines into 1 project.


Octopus Deploy Process

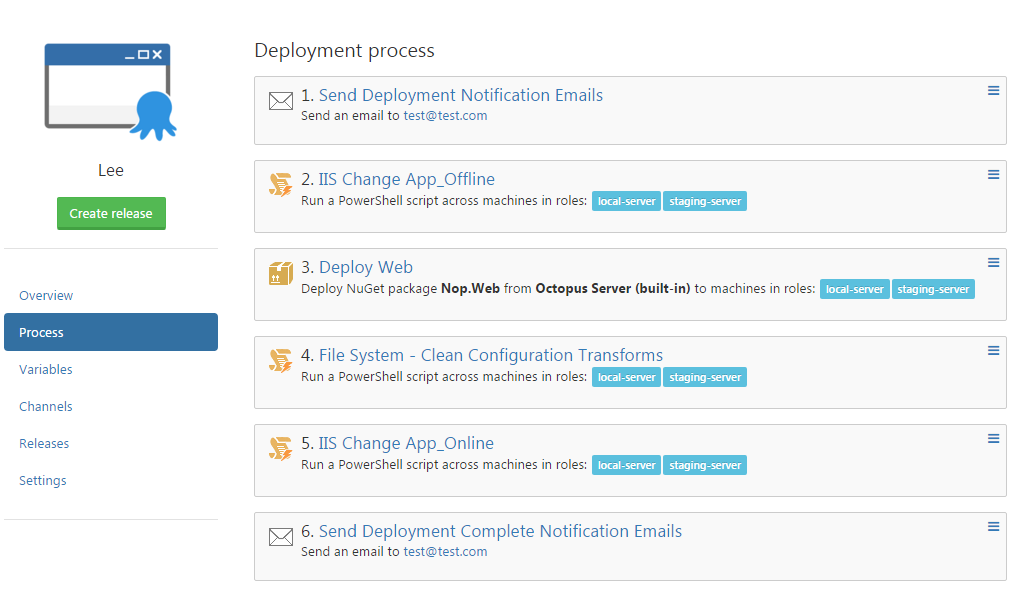
We have setup a simple Deployment Process as below.
  1. Send out notification email 
  2. Change to app offline
  3. Deploy the package
  4. Clean up the redundant transformation config
  5. Bring the site online (from app offline)
  6. Send out notification email (again)


Octopus Step Template

I have created some custom step templates that were not available in the community library.

Octopus Notification Integration

I also added a slack integration that will send notification to all developers upon deployment. I found notification is a better channel to communicate than automated emails clogging up in the inbox. As a teaser, our notification channel looks like this.


Conclusion

It is a tedious and enormous job to deploy 20+ websites in our web farm environment. Octopus Deploy was not difficult to setup, and all our deployment jobs are now automatically deployed from our continuous deployment server. Not only we are saving times, but also we are now able to eliminate any possible human errors in our deployment process.

Setting Up Jenkins for GitHub


Scope

Previously, I have setup Jenkins with TFS without much issues. This time I am setting up Jenkins to work with GitHub.

Git

We will need to install GitHub Plugin on our Jenkins server. We can verify our installation from Manage Jenkins -> Manage Plugins.


Then, we will need to install the Git Executable from git-scm.

We then need to setup our Git via Manage Jenkins -> Configure System -> Git -> Git Installations -> Path to Git executable.


We will create a Jenkins Job fill in the Source Code Management information similar to follow.


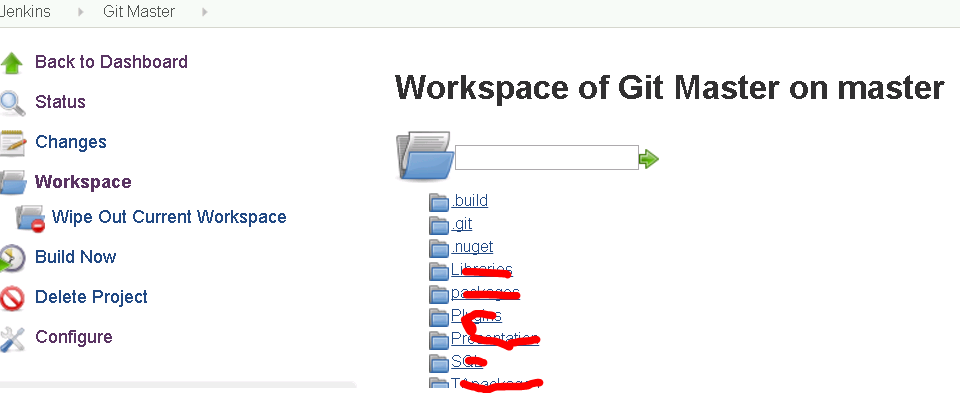
Test our build job to make sure we can get all source code in the workspace of our Jenkins server before we move on to the next stage.


MSBuild

After setting up our job to successfully clone from the Git repository, we will now set up our build process as part of our continuous integration.

Manage Jenkins -> Configure System -> MSBuild


Notice there is a warning about MSBuild.exe is not a directory. If we omit the executable part, we will get an error like the following. I believe this is minor bug in Jenkins. That's why it is always important to check the Console Output to see what the error is.


Then we set up our build job.


Troubleshooting

.Net 4.5.1

I have encountered the some errors about .Net 4.5.1 not found.

C:\Windows\Microsoft.NET\Framework\v4.0.30319\Microsoft.Common.targets(983,5): warning MSB3644: The reference assemblies for framework ".NETFramework,Version=v4.5.1" were not found.

I tried to download the Targeting .Net Platforms but I am still getting the same error.

Until I found this solution. I just copied the reference aseemblies from my dev machine to our Jenkins server with the exact same location.

C:\Program Files (x86)\Reference Assemblies\Microsoft\Framework\.NETFramework\v4.5.1

VS2012

error MSB4019: The imported project "C:\Program Files (x86)\MSBuild\Microsoft\VisualStudio\v11.0\WebApplications\Microsoft.WebApplication.targets" was not found.

Our projects were upgraded from VS2012 to 2013, and there seems an issue to do with the extra properties in the .csproj file.

The short fix is to specify the VisualStudioVersion parameter to MSBuild.

Manage Jenkins -> Configure System -> MSBuild


Or the long fix to clean the .csproj files.

NuGet

error : The build restored NuGet packages. Build the project again to include these packages in the build.

This reminds me one of the NuGet issue we had when integrating Jenkins with VSO. However, a perfect solution does not always solve the problem in an imperfect world. That's because our current process do not Restore Nuget Packages the Right Way.

Thanks to Jenkins, there is a workaround for it. We can add a windows command process before getting into the MSBuild process by using a Windows batch command.

C:\Tools\nuget.exe restore NopCommerce.sln


Conclusion

Had a fun time to set all this up (again). Plus one to our Joel Test score!


Restore NuGet Packages the Right Way

The Infamous Right Click to Enable NuGet Package Restore

Recently engaged in a conversation about NuGet and one of the developers suggested to me "Did you right click the solution to enable NuGet restore?" I was a little shock and unease as this is a very very old and obsoleted way of using NuGet and is not relevant in today's code of practice.

Let's learn the right way together!

NuGet Team documented 3 ways to restore packages.
  1. Automatic Package Restore in Visual Studio
  2. Command-Line Package Restore
  3. MSBuild-Integrated Package Restore
As the NuGet Team explained.
"Prior to NuGet 2.7, an MSBuild-Integrated Package Restore approach was used and promoted. While this approach is still available, the NuGet team suggests using the Automatic Package Restore and Command-Line Package Restore instead."
Or what other people twitted.
"Every Time someone enables #nuget package restore on a solution, a kitten dies. Learn the new workflow!"

Verdict

What is the best practice? Automatic Package Restore is the number one recommended method. You may however find yourself using CLI Packge Restore if you are building a CI server which is not so bad. The worst possible scenario is you are still doing "Right Click to Enable NuGet Package Restore". Say hello to 2015 :)


Setup Continuous Integration with Visual Studio Online

Scope

I am looking to setup a continuous integration service to our process. I have previously setup Jenkins on another project, but I am after something that could cost me less time to setup. We already using Visual Studio Online for our file repository and it comes with a CI integration that I maybe able to utilize.

Steps

Create a Build

  1. In visual studio, go to Team Explorer
  2. Select Builds -> New Build Definition
  3. In Trigger, we will choose continuous integration 
  4. In Source Settings, we will pick the branch that we are working on as active; We will pick folders that we do not want to include for the build as cloak, this will reduce the time for the CI server to get the files.
  5. After walking thru the wizard, we will save our build definition.
  6. We now have our first CI build for the branch.

Email Notification

  1. In Team Explorer, go to Settings
  2. Under Team Project, choose Project Alerts
  3. Choose Advanced Alerts Management Page
  4. We can choose to receive alerts if a build complete or a build fail

NuGet

In our solution, we do not check in packages to the version control as we use NuGet to get the binaries to our workspace. This caused a little problem in CI as the build server doesn't seem as smart as our workspace that it would download the packages from NuGet.

After some extensive readings, we know that NuGet.exe command tool is available in VSO. In step 3, I am adding a pre-build event that will force MSBuild to restore NuGet packages before building the solution. In step 1 and 2, I simply need to download and setup NuGet.exe command for local development environment.

  1. Download NuGet.exe to local environment. https://nuget.codeplex.com/releases
  2. Add local NuGet.exe to Path in your Systerm Enivronment Variables 
  3. Add our magic line in the pre-build event of the project.
    nuget.exe restore $(SolutionPath)
  4. Build solution locally. We need to test and make sure the if the nuget runs correctly or not in local.
  5. If you get a 9009 exit code, it means the NuGet.exe path cannot be find. Restart visual studio or try run the NuGet restore in command prompt to see if the exe path is set correctly.

Test the Build

Time to test the build.
  1. Right click on the build and choose Queue New Build
  2. Choose Queue on the next screen. The build is now queue up in the build controller.
  3. Right click on the build and choose View Build. We can verify if the test build successful or not.

Thoughts

I am quite impressed about CI in VSO. Firstly, it is already available to me as a service and I did not have to setup a machine for it. It has a nice integration with Visual Studio and I am able to create / run builds from VS easily. The overall experience is more user friendly than Jenkins.

Ref

What are the 2 types of NuGet Package Restore?
http://docs.nuget.org/docs/reference/package-restore

Package Restore with Team Foundation
http://docs.nuget.org/docs/reference/package-restore-with-team-build

A little more hint about why a CI build might fail with NuGet packages.
http://blogs.msdn.com/b/dotnet/archive/2013/08/12/improved-package-restore.aspx

Setup Jenkins on TFS 2008 for MSBuild project

Installation

Download TFS plugin from https://wiki.jenkins-ci.org/display/JENKINS/Team+Foundation+Server+Plugin

Download MSBuild plugin from https://wiki.jenkins-ci.org/display/JENKINS/MSBuild+Plugin

You may go to the jenkins-ci wiki page to download the plugin manually or it can be downloaded via Manage Plugin page, either way is fine.

Install plugin under Manage Jenkins.


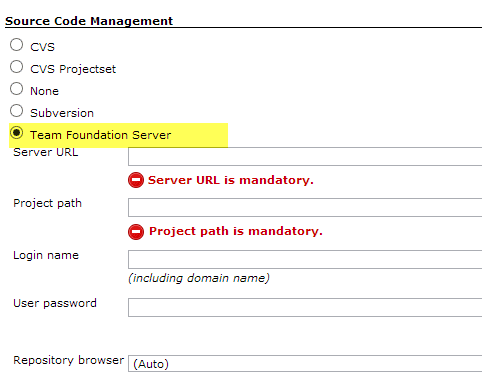
Now TFS is available as an option in Source Code Management.


Plugin can also be found and installed by using the plugin manager.


Troubleshooting during installation


The following error maybe encountered if TF.exe is not installed or path to access TF.exe is not configured in Jenkins.
Started by user anonymous
Building in workspace C:\Program Files (x86)\Jenkins\jobs\XXX\workspace
[workspace] $ tf workspaces -format:brief -server:tfs.server.com ********
java.io.IOException: Cannot run program "tf" (in directory "C:\Program Files (x86)\Jenkins\jobs\XXX\workspace"): CreateProcess error=2, The system cannot find the file specified
 at java.lang.ProcessBuilder.start(Unknown Source)
 at hudson.Proc$LocalProc.<init>(Proc.java:244)
 at hudson.Proc$LocalProc.<init>(Proc.java:216)
 at hudson.Launcher$LocalLauncher.launch(Launcher.java:773)
 at hudson.Launcher$ProcStarter.start(Launcher.java:353)
 at hudson.plugins.tfs.TfTool.execute(TfTool.java:99)
 at hudson.plugins.tfs.model.Server.execute(Server.java:47)
 at hudson.plugins.tfs.model.Workspaces.getListFromServer(Workspaces.java:38)
 at hudson.plugins.tfs.model.Workspaces.populateMapFromServer(Workspaces.java:50)
 at hudson.plugins.tfs.model.Workspaces.exists(Workspaces.java:76)
 at hudson.plugins.tfs.actions.CheckoutAction.checkout(CheckoutAction.java:36)
 at hudson.plugins.tfs.TeamFoundationServerScm.checkout(TeamFoundationServerScm.java:175)
 at hudson.model.AbstractProject.checkout(AbstractProject.java:1408)
 at hudson.model.AbstractBuild$AbstractBuildExecution.defaultCheckout(AbstractBuild.java:676)
 at jenkins.scm.SCMCheckoutStrategy.checkout(SCMCheckoutStrategy.java:88)
 at hudson.model.AbstractBuild$AbstractBuildExecution.run(AbstractBuild.java:581)
 at hudson.model.Run.execute(Run.java:1603)
 at hudson.model.FreeStyleBuild.run(FreeStyleBuild.java:46)
 at hudson.model.ResourceController.execute(ResourceController.java:88)
 at hudson.model.Executor.run(Executor.java:247)
Caused by: java.io.IOException: CreateProcess error=2, The system cannot find the file specified
 at java.lang.ProcessImpl.create(Native Method)
 at java.lang.ProcessImpl.<init>(Unknown Source)
 at java.lang.ProcessImpl.start(Unknown Source)
 ... 20 more
Finished: FAILURE

The missing file can be downloaded in here.

http://www.microsoft.com/en-us/download/details.aspx?id=16338

Install in progress….


The following error maybe encountered if path to TF is not given.


The next step is to tell Jenkins where TF is. In Jenkins –> Configure System, depends on the version of .Net Framework, apply the path as follow.


Setup for MSBuild Project

Once the Jenkins is setup, by default it is only getting the files. The next step is to setup the MSBuild for the project.


In [Project] –> configuration –> Build –> Add build step, we will setup as follow.

Add build step will now have an option to use MSBuild.


As described in the jenkins-ci wiki page, we need to configure the MSBuild. A simple setup for .Net framework 4.0 as follow.


Trigger a build from check in

Perhaps, one of the most interesting feature of CI is the ability to continuously ensure the integrity of the build. Hence the name continuous integration. With the ability to trigger a build from any check-ins from developers, we have immediate feedback if any piece of check-ins causing troubles. This can be achieved by polling the SCM periodically. The online help with Jenkins is quite comprehensive, it follows the cron syntax.