Pages - Menu

Git - Moving Code between Repositories Changing Commit History

Scenario

As part of our microservices migration, we recently did a lot of code moving and splitting from one monolithic repository into multiple smaller repositories.

Perhaps it is easier to just copy and paste files and done with, but if we want to retain the commit history as we move, then it will take a little extra efforts.

Steps

Create New Repository

Firstly, we need to create a new repository. We could do that in Azure DevOps.


Move a subfolder (with commit history) to a different repository


Preparing local folders
# Clone the old repo locally.
$ mkdir new_repo_folder
$ cd new_repo_folder
$ git clone old_repo_url
$ cd old_repo_folder

Filter out by subfolder
# If you are moving subfolder of subfolder, we need to use slash as a path delimiter even in Windows.
$ git filter-branch --subdirectory-filter another_subfolder_if_any/subfolder_to_move -- --all
$ git remote -v                                                    
$ git remote set-url origin new_repo_url                      
$ git remote -v                                                    
$ git push origin

At this point, this is now completed. All the codes in the subfolder are moved to the new repository with all the history. However the new repository will have a local path new_repo_folder/old_repo_folder/code. If we want it to look like new_repo_folder/code, we can just clean it up by copy and paste.

Extra

As we were trying out and moving codes around, I have also encountered some rare scenarios and learnt some 'rarely' needed commands.

Cherry pick commits from another repository to a subfolder locally

# go to dest folder
$ git clone dest_repo_url
$ cd dest
$ git checkout dest-branch
$ git checkout -b merge-src-to-dest

# add the copy source repo as new remote
$ git remote add src src_repo_url
$ git remote -v
$ git fetch src

# Specify remote name when cherry pick, and supply subtree parameter to apply to subfolder
# tip of the branch
$ git cherry-pick -Xsubtree="subfolders/more-subfolder" src/remote-branch-name

# 4th commit from the branch
$ git cherry-pick -Xsubtree="subfolders/more-subfolder" src/remote-branch-name~4

# commit hash don't require remote-branch-name, but src must be fetched
$ git cherry-pick -n -Xsubtree="subfolders/more-subfolder" commit-hash

# git cherry pick of a merge (eg. merged pull request)
$ git cherry-pick -Xsubtree="subfolders/more-subfolder" src/remote-branch-name -m 1

# clean up
$ git remote rm src

Other Commands

# Rename a remote branch name
$ git branch -m old_branch new_branch
$ git push origin new_branch

# but we still point to the remote old_branch in .git
[branch "new_branch"]
 remote = origin
 merge = refs/heads/old_branch

# Create 'new_branch' and set up track remote at the same time.
$ git push origin -u new_branch

# git push to a different remote branch
$ git push origin src-branch:target-branch
$ git push origin branch1:branch2

Google Material Design Components Undocumented Tricks

Scope

Recently we are migrating from bootstrap to material design by using the Material Design Components for Web. The library is useful but there are some area that are not fully documented. In particular, how to change break points, add extra device type and using media queries.

Code

mdc-layout-grid - change breakpoints

While it is documented for mdc-typography on how to change h1, h2 etc, it is not so the same for mdc-layout-grid.

By default, @material/layout-grid/_variables.scss have the following !default css.

$mdc-layout-grid-breakpoints: (
  desktop: 840px,
  tablet: 480px,
  phone: 0px
) !default;


Went through some of the discussion and found the following variables that would allow me to change breakpoints.

$mdc-layout-grid-breakpoints: (
  desktop: 992px, // some custom value
  tablet: 768px,
  phone: 0px
);

mdc-layout-grid - add extra device type

According to our design, we want to cater for xlarge desktop display, I added an extra breakpoints and getting the following error.

$mdc-layout-grid-breakpoints: (
  xlarge-desktop: 1920px,
  desktop: 992px,
  tablet: 768px,
  phone: 0px
);


There is some hint in the error.in the _mixin line 20, it is returning an error of the following.

@error "Invalid style specified! Choose one of #{map-keys($mdc-layout-grid-columns)}";

Then I run into another error.


It is necessary to provide all the default parameters in the mixin, and the error will go away.

mdc-layout-grid - media queries

// Private mixins, meant for internal use.
@mixin mdc-layout-grid-media-query_($size) {

We use the Sass Map to get the value from our variables dynamically.

.row {
  @include mdc-layout-grid-inner(
    phone, 
    map-get($mdc-layout-grid-default-margin, phone), 
    map-get($mdc-layout-grid-default-gutter, phone)
  );

  @media (min-width: mdc-layout-grid-breakpoint-min(tablet)) {
    @include mdc-layout-grid-inner(
      tablet, 
      map-get($mdc-layout-grid-default-margin, tablet), 
      map-get($mdc-layout-grid-default-gutter, tablet)
    );
  }
  @media (min-width: mdc-layout-grid-breakpoint-min(desktop)) {
    @include mdc-layout-grid-inner(
      desktop, 
      map-get($mdc-layout-grid-default-margin, desktop), 
      map-get($mdc-layout-grid-default-gutter, desktop)
    );
  }
  @media (min-width: mdc-layout-grid-breakpoint-min(xlarge-desktop)) {
    @include mdc-layout-grid-inner(
      xlarge-desktop, 
      map-get($mdc-layout-grid-default-margin, xlarge-desktop), 
      map-get($mdc-layout-grid-default-gutter, xlarge-desktop)
    );
  }
}

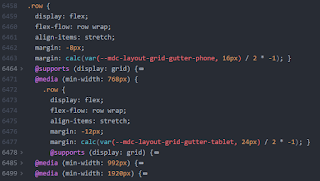
The produced css will have media query targeting different width.


We can then shorten the above by writing our own mixin.

@mixin mdc-layout-grid-inner-media-query($size) {
  @if not map-has-key($mdc-layout-grid-columns, $size) {
    @error "Invalid style specified! Choose one of #{map-keys($mdc-layout-grid-columns)}";
  }

  @media (min-width: mdc-layout-grid-breakpoint-min($size)) {
    @include mdc-layout-grid-inner(
      $size,
      map-get($mdc-layout-grid-default-margin, $size),
      map-get($mdc-layout-grid-default-gutter, $size)
    );
  }
}

.row {
  @include mdc-layout-grid-inner(
    phone, 
    map-get($mdc-layout-grid-default-margin, phone), 
    map-get($mdc-layout-grid-default-gutter, phone)
  );

  @include mdc-layout-grid-inner-media-query(tablet);
  @include mdc-layout-grid-inner-media-query(desktop);
  @include mdc-layout-grid-inner-media-query(xlarge-desktop);
}


How to Install posh-git Behind Firewall

Scope

Trying to install posh-git following the installation note, but getting some error.


Prerequsite

Powershell version 2 or above. Version 5 can be downloaded here.

$PSVersionTable.PSVersion

Major  Minor  Build  Revision
-----  -----  -----  --------
5      0      10586  117

Script execution policy must be set to either RemoteSigned or Unrestricted.

$ Set-ExecutionPolicy RemoteSigned -Scope CurrentUser -Confirm

Troubleshooting

$ Get-PSRepository
WARNING: Unable to find module repositories.

These errors are indicating that there are no repository available. I have installed posh-git many times and this doesn't look normal to me, since I am also having some proxy issue with my new machine, I am suspecting it could be a firewall / network issue.

I tried some of this, but not much luck.


WARNINGS: Do not use npm install -g posh-git. It is a replica of the original posh-git but not the same package as the genuine one. Look at the package note, it stated that "This is a new project, it's currently working only on Linux..." and the author is not dahlbyk.

$ Install-PackageProvider -Name NuGet -MinimumVersion 2.8.5.201 -Verbose -Force

VERBOSE: MSG:UnableToDownload «https://go.microsoft.com/fwlink/?LinkID=627338&clcid=0x409» «»
VERBOSE: Cannot download link 'https://go.microsoft.com/fwlink/?LinkID=627338&clcid=0x409', retrying for '2' more times
VERBOSE: MSG:UnableToDownload «https://go.microsoft.com/fwlink/?LinkID=627338&clcid=0x409» «»
VERBOSE: Cannot download link 'https://go.microsoft.com/fwlink/?LinkID=627338&clcid=0x409', retrying for '1' more times
VERBOSE: MSG:UnableToDownload «https://go.microsoft.com/fwlink/?LinkID=627338&clcid=0x409» «»
VERBOSE: Cannot download link 'https://go.microsoft.com/fwlink/?LinkID=627338&clcid=0x409', retrying for '0' more times
WARNING: Unable to download the list of available providers. Check your internet connection.

$ choco install poshgit
# I cannot even get chocolatey to install because of the same proxy issue... so not an option

$ (new-object Net.WebClient).DownloadString("http://psget.net/GetPsGet.ps1") | iex install-module posh-git

Exception calling "DownloadString" with "1" argument(s): "The remote server returned an error: (407) Proxy Authentication Required."

Solution

Finally, I went back to the basics, I bypassed the firewall but a direct git clone to the source code and solved the issue.

$ git clone https://github.com/dahlbyk/posh-git.git
$ .\posh-git\install.ps1

Extra

I found the default color was a little too dark against the dark background color, so I made some changes in ~/.git/config to make it easier to read.

[color]
    ui = true 
[color "status"]
    changed = magenta bold
    untracked = yellow bold

Better contrast after changing the color

Google AMP Hackathon 2017

Google AMP Hackathon

Recently got invited by Google to join their AMP Hackathon at the Sydney HQ. Very exciting opportunity to get my hands dirty with the engineers from the Google AMP team. Here are some prerequisite courses that we have to do before the day.

Hackathon

The performance of AMP is very impressive, it is not hard to see pages loaded in under 2 seconds, and here is the trade off for the speed.
  • No external JS (aka no React / Angular etc)
  • No external CSS (no bootstrap)
  • Inline CSS limit to 50kb
As we can see immediately why the site can be loaded at such lightning speed. As their engineer described, "it is very hard to make amp page to load slow".

During the hackathon, I went for a harder piece of work. I was trying to build the sorting filter in the product listing page by using amp-bind and amp-list, similar to one of this.

This is what a product listing page looks like on our site.


My attempt of our product listing page by using AMP.


Using amp-bind and json to render the sorting options in amp-list.

<select on="change:AMP.setState({
  src: '/json/related_products'+event.value+'.json'
})">

<amp-list class="items"
  width="600"
  height="900"
  layout="responsive"
  src="/json/related_products.json"
  [src]="src">

The last part is to assemble the json for the amp-list to consume and presented by amp-mustache. The json is exposed from our back end system.


PWA

In their presentations, we also briefly went over the PWA stuff. Seems like an interesting combo to use both AMP and PWA by using the amp-install-serviceworker component.

Additional Readings

Photos

Had a little guided tour in the office and snapped some photos with my mobile phone.


Corridor and lift area look like a train carriage.


Using redux-persist to Persist and Rehydrate

Scope

Our product listing page is async loaded by react ajax calls. We want to handle a 'browser back button' scenario that when the user click back, the ajax parameter will persist and the same products can be loaded on the page. A common problem when making ajax call that would change a page content after the page loaded.

Code

Setup

Install redux-persist and follow the doc to setup the enhancer.

In order to achieve what we want, we need to first persist our state somewhere, then retrieve and rehydrate the state.

Persist

As opposed to the blacklisting example, we are doing it by whitelisting.

persistStore(store, {whitelist: ['myReducer1', 'myReducer2']}, () => {
  console.log('redux-persist rehydrated')
})

Redux-persist will raise an action called 'persist/REHYDRATE' and we need to create a reducer to handle this.

import {REHYDRATE} from 'redux-persist/constants'

const reduxPersist = (state, action) => {
  if (state == undefined)
  {
    return Object.assign({}, state, null)
  }

  switch (action.type) {
    case REHYDRATE:
      if (action.payload.myReducer1 && action.payload.myReducer2) {
        return Object.assign({}, state, {
          myReducer1: action.payload.myReducer1,
          myReducer2: action.payload.myReducer1
        })
      }
      return state
  }
}
export default reduxPersist

This will persist our state in a state called reduxPersist. It is a preserved keyPrefix for the localstorage default key, so that autoRehydrate can retrieve the persisted state.

Only myReducers are persisted, others are not persisted.

Auto Rehydrate

We can rehydrate a state either by using autoRehydrate or manually doing it.

To setup autoRehydrate, we just need to add an enhancer to our store. Then our state tree is automatically rehydrated when we reload the page.

const store = createStore (
    combinedReducer, 
    undefined,
    compose(
        applyMiddleware( thunk, logger ),
        autoRehydrate()
    )
)

Manual Rehydrate

Who likes driving manual transmission these days? I do and it gives me more granular control over what I want to achieve.

To setup manual rehydrate is not as hard as it sound. We just need to pass in the reduxPersist payload in the action and utilize it in the reducer.

In the action,

return {
  type: 'UPDATE_MY_FIELDS',
  myFields: somefields,
  payload: payload
}

In the reducer,

case 'UPDATE_MY_FIELDS':
  var shouldReadCache; // some boolean custom logics
  if (shouldReadCache)
  {
    return Object.assign({}, state, {
      myFields: action.payload.myReducer1.myFields
    })
  }
  else {
    return Object.assign({}, state, {
      myFields: action.myFields
    })
  }

Conclusion

Auto rehydrate works out of the box like a charm if implemented correctly, but manual rehydrate still has its place especially for more complicated scenarios. I did not run into race conditions like other people did, but our fetch calls are usually wrapped by using the promise.

Git Ignore Conflicts During Rebase

Scenario

During a git rebase, I am getting conflicts on artifacts that I am not interested in merging.

For example, I am only interest in merging scss files but not the css, because the css is already minified and will be hard to merge via mergetool. A more sensible way is to ignore the merge and recompile the css at the end of the rebase.

Code

On a typical git rebase master, you may get some conflicts like this.


According to advanced git article, this can be achieved by using skip.

$ git rebase --skip

Git will try to do an auto-merge on the files and leave dirty files in the folder. From this point, we can recompile our css and git add them.

Conclusion

If your code base require you to check in compiled artifacts, highly recommended to do that as a separate commit. That will make your life easier on merge and rebase.


Redux Form - How to Set Checkbox Initial Value

Scope

We have a very simple requirement that wants to conditionally default the checkbox to checked for our checkout page.


Troubleshooting

Since we use react/redux, so naturally we use redux-form (currently at v6.8.0) for our form fields.

For a checkbox, our code will be like this.

<Field name={this.props.fields.addToAddressBook}
 id={this.props.fields.addToAddressBook}
 component="input"
 type="checkbox"
 checked={this.props.isAddToAddressBook}
 value={this.props.isAddToAddressBook}
 onChange={(e) => this.handleIsAddToAddressBook(e)}
/>

My state has the isAddToAddressBook: true.


However, in my console, the value is null even when the checkbox is checked.


Arguably we can use the checked field instead of the value, but Demandware doesn't allow that, so let's fix the value.

Tried a few different ways and still getting empty value.

value={this.props.isAddToAddressBook.toString()}

value={this.props.isAddToAddressBook ? 'true' : 'false'}

I also tried using defaultValue,

defaultValue={this.props.isAddToAddressBook}

it sets the defaultValue but not the value.


Solution

<input className="form-indent label-inline"
 name={this.props.fields.addToAddressBook}
 id={this.props.fields.addToAddressBook}
 type="checkbox"
 checked={this.props.isAddToAddressBook}
 value={this.props.isAddToAddressBook}
 onChange={(e) => this.handleIsAddToAddressBook(e)}
/>

Surprisingly and ironically, the solution is not to use redux-form field but normal redux binding.

Not an elegant solution if you need to write your own validation handler, but if validation is not required, this is actually cleaner. If it doesn't need to be in redux-form; then it shouldn't be in redux-form.

Reference

  • https://github.com/erikras/redux-form/issues/334
  • https://stackoverflow.com/questions/41452053/in-redux-form-how-can-i-set-the-initial-value-of-the-checked-property-of-a-chec