Pages - Menu

Testing with CyberSource

I had some random issues about testing in CyberSource in the past. I asked their support a few questions, back and forth. These are already documented by CyberSource, but I found it easier to summerize them in one place.

Test Credit Card

I found this numbers from the DM_developer_guide_SCMP_API.pdf. This can be downloaded from their CyberSource Test Business Center.

American Express  3782 8224 6310 005
MasterCard 5555 5555 5555 4444
Visa 4111 1111 1111 1111

Test Total Amount

If the grand total amount is between $100 and 200, the system may or may not throw error as it is designed for testing different responses. I learnt this in a hard way.

http://www.cybersource.com/developers/getting_started/test_and_manage/simple_order_api/FDI_Australia/soapi_fdiaus_err.html

Test CVV

Similarly, CVV between 901 and 906 yield to different AuthReply response. By the look at the pattern, they might add more test cases later on, so I would avoid using anything > 900.

http://www.cybersource.com/developers/getting_started/test_and_manage/simple_order_api/FDI_Australia/soapi_fdiaus_cvv.html

Setup Continuous Integration with Visual Studio Online

Scope

I am looking to setup a continuous integration service to our process. I have previously setup Jenkins on another project, but I am after something that could cost me less time to setup. We already using Visual Studio Online for our file repository and it comes with a CI integration that I maybe able to utilize.

Steps

Create a Build

  1. In visual studio, go to Team Explorer
  2. Select Builds -> New Build Definition
  3. In Trigger, we will choose continuous integration 
  4. In Source Settings, we will pick the branch that we are working on as active; We will pick folders that we do not want to include for the build as cloak, this will reduce the time for the CI server to get the files.
  5. After walking thru the wizard, we will save our build definition.
  6. We now have our first CI build for the branch.

Email Notification

  1. In Team Explorer, go to Settings
  2. Under Team Project, choose Project Alerts
  3. Choose Advanced Alerts Management Page
  4. We can choose to receive alerts if a build complete or a build fail

NuGet

In our solution, we do not check in packages to the version control as we use NuGet to get the binaries to our workspace. This caused a little problem in CI as the build server doesn't seem as smart as our workspace that it would download the packages from NuGet.

After some extensive readings, we know that NuGet.exe command tool is available in VSO. In step 3, I am adding a pre-build event that will force MSBuild to restore NuGet packages before building the solution. In step 1 and 2, I simply need to download and setup NuGet.exe command for local development environment.

  1. Download NuGet.exe to local environment. https://nuget.codeplex.com/releases
  2. Add local NuGet.exe to Path in your Systerm Enivronment Variables 
  3. Add our magic line in the pre-build event of the project.
    nuget.exe restore $(SolutionPath)
  4. Build solution locally. We need to test and make sure the if the nuget runs correctly or not in local.
  5. If you get a 9009 exit code, it means the NuGet.exe path cannot be find. Restart visual studio or try run the NuGet restore in command prompt to see if the exe path is set correctly.

Test the Build

Time to test the build.
  1. Right click on the build and choose Queue New Build
  2. Choose Queue on the next screen. The build is now queue up in the build controller.
  3. Right click on the build and choose View Build. We can verify if the test build successful or not.

Thoughts

I am quite impressed about CI in VSO. Firstly, it is already available to me as a service and I did not have to setup a machine for it. It has a nice integration with Visual Studio and I am able to create / run builds from VS easily. The overall experience is more user friendly than Jenkins.

Ref

What are the 2 types of NuGet Package Restore?
http://docs.nuget.org/docs/reference/package-restore

Package Restore with Team Foundation
http://docs.nuget.org/docs/reference/package-restore-with-team-build

A little more hint about why a CI build might fail with NuGet packages.
http://blogs.msdn.com/b/dotnet/archive/2013/08/12/improved-package-restore.aspx

nopCommerce - Schedule Task Plugin

Scope

Recently having issues with the integration with our payment gateway provider. Occasionally our synchronize call to their server will not get a response back.

We are to write a schedule function to run regularly. It will pull out a list of pending orders and re-run the authorize and capture.

We are:-
  • using nopCommerce 3.3
  • utilizing the nopCommerce Schedule Task
  • using plugin approach

Technical Overview

We are to use the Nop.Services.Tasks.Task and ScheduleTaskService to create a Nop Schedule Task that runs periodically.

Implementation

Task

Firstly create a new plugin. In our plugin, we will create a MyTask class that implements ITask.


The only method in the interface is Execute(). This is the place where we will put our calling codes. In this example, I am calling my own method QueryPendingOrders().

IoC

In my example, I am using a new service class, so I will need to register the service class via IoC in our plugin. A new DependencyRegistrar class will do the trick.


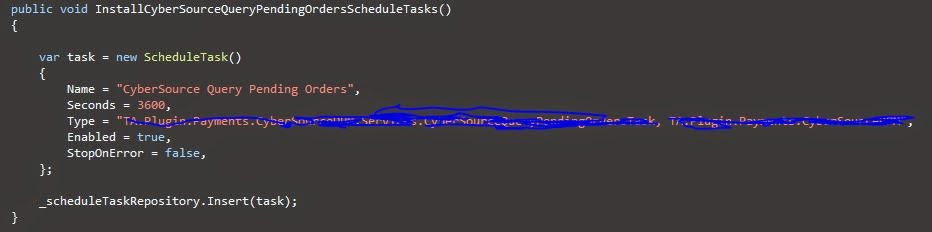
Install Schedule Task

Next, we need to create a schedule task for the task. This can be done by 
the overrides of Nop.Core.Plugins.BasePlugin, In the Install() of my plugin, we will call the following.


Calling Method

For the purpose of demonstration, I am just writing to the log.


Schedule

After installing the plugin, a new schedule task is created as follow. (I have changed the run period to 60 seconds for demo)


Log

Let it run for a few minutes and check the log. It seems quite spot on that it is called every 60 seconds.


Conclusion

There was not much work involved to create a schedule task. All the magic are already done and made available for us from the nopCommerce.

During development, I noticed the TaskManager utilize singleton pattern. It is then responsible to instantiate the instances for the TaskThread. The task threads will run continuously and kick off the Execute() periodically. 

One thing I wanted to do is to compare the performance between Nop Schedule Task vs SQL Server Agent Job. I have a feeling that the sql job may run a little faster as the nop task thread is not a push notification, but simply a continuous running thread.


Contribute to Open Source nopCommerce project via Git

Scope

Since nopCommerce 3.4, the project is now moved from Mercurial to Git. The following shows a little example on how to do it. In this example, I am going to add a field in the DiscountBoxModel so that I can display different color if the discount is applied sucessfully or not. The fork is here.

Codeplex

Fork and pull request were previously discussed here.
http://tech.sunnyw.net/2013/11/contribute-to-mercurial-in-simple-steps.html

Git

Clone

After we fork, the clone command will get latest from remote repository to the local directory.

$ git clone https://git01.codeplex.com/forks/swon/discountboxisapplied
C:\tfs\Nop34> git clone https://git01.codeplex.com/forks/swon/discountboxisapplied
Cloning into 'discountboxisapplied'...
remote: Counting objects: 111111, done.
remote: Compressing objects: 100% (30586/30586), done.
Receiving objects: 100% (111111/111111), 257.70 MiB | 706.00 KiB/s, done.
emote: Total 111111 (delta 81017), reused 107610 (delta 78287)
Resolving deltas: 100% (81017/81017), done.
Checking connectivity... done
Checking out files: 100% (5332/5332), done.
We can verify by ls that we now have the files in local.

$ ls discountboxisapplied
    Directory: C:\tfs\Nop34\discountboxisapplied


Mode                LastWriteTime     Length Name
----                -------------     ------ ----
d----         1/09/2014   5:22 PM            src
d----         1/09/2014   5:19 PM            upgradescripts
-a---         1/09/2014   5:19 PM       2473 .gitignore
-a---         1/09/2014   5:19 PM        980 README.md

Status

After I made some changes to my files in local, the status command will show me the pending changes.

$ git status
# On branch master
# Changes not staged for commit:
#   (use "git add <file>..." to update what will be committed)
#   (use "git checkout -- <file>..." to discard changes in working directory)
#
#       modified:   src/Presentation/Nop.Web/Controllers/ShoppingCartController.cs
#       modified:   src/Presentation/Nop.Web/Models/ShoppingCart/ShoppingCartModel.cs
#       modified:   src/Presentation/Nop.Web/Nop.Web.csproj
#       modified:   src/Presentation/Nop.Web/Themes/DefaultClean/Content/styles.css
#       modified:   src/Presentation/Nop.Web/Views/ShoppingCart/_DiscountBox.cshtml
#
no changes added to commit (use "git add" and/or "git commit -a")

Commit

The commit command will now commit my changes to the repository, but before that happens, this command will cause my editor to popup and I will be able to enter my commit message.
$ git commit -a
[master 6762145] Add an additional IsApplied field to indicate if discount code
is applied successfully.
 5 files changed, 11 insertions(+), 2 deletions(-)

Push

After committing to our local repository, the last thing to do is to synchronize the changes from our local repository to the remote repository. This is done by push.
$ git push
Counting objects: 35, done.
Delta compression using up to 4 threads.
Compressing objects: 100% (18/18), done.
Writing objects: 100% (18/18), 1.68 KiB | 0 bytes/s, done.
Total 18 (delta 14), reused 0 (delta 0)
To https://git01.codeplex.com/forks/swon/discountboxisapplied
   89f0ede..6762145  master -> master

Conclusion

Obviously there are more commands and options in Git. This article only showed the basic operations on how to contribute codes to an open source project.

As a developer that traveling between VSS, SVN, ClearCase, TFS, Mercurial and Git, I am not too excited about what tools are used, but rather what and how can be done. The way how fork and clone, push and pull are certainly innovative for open source platform. I found the commands were simple to use, and easy to remember. The experience was quite nice.